
To photograph the northern lights, mount your camera on a tripod and shoot in manual mode: ISO 1600, the widest aperture your lens allows (f/2.8 is ideal, f/4 works), a 20-second shutter, and manual focus on a bright star. From there, read the aurora and adjust: drop the shutter to 5 to 10 seconds when it is moving fast, and push the ISO higher when the display is faint.
- ISO: 1600 baseline. Push higher only if the aurora is faint and your camera handles noise well.
- Aperture: As wide as your lens allows. f/2.8 is ideal; f/4 works in a pinch.
- Shutter speed: Start at 20 seconds. Drop to 5 to 10 seconds for fast-moving “dancing” aurora; raise it for faint slow glows.
- Focus: Manual focus. Try to lock on a bright star (zoom in to confirm sharpness) or use a known-good infinity mark.
- White balance: Set it manually to around 3500 to 4500K. Auto white balance often throws an orange cast over a night sky.
- Tripod: Mandatory. Use a remote release or 2-second timer to avoid shake.
This is the quick reference. The rest of this article explains why these settings work, the gear I actually recommend, and the mistakes I see most photographers make in the field. For broader aurora planning (KP, when to chase, where to go), see my Ultimate Guide To Chasing & Photographing The Northern Lights. For iPhone-specific settings, see my iPhone Northern Lights guide.
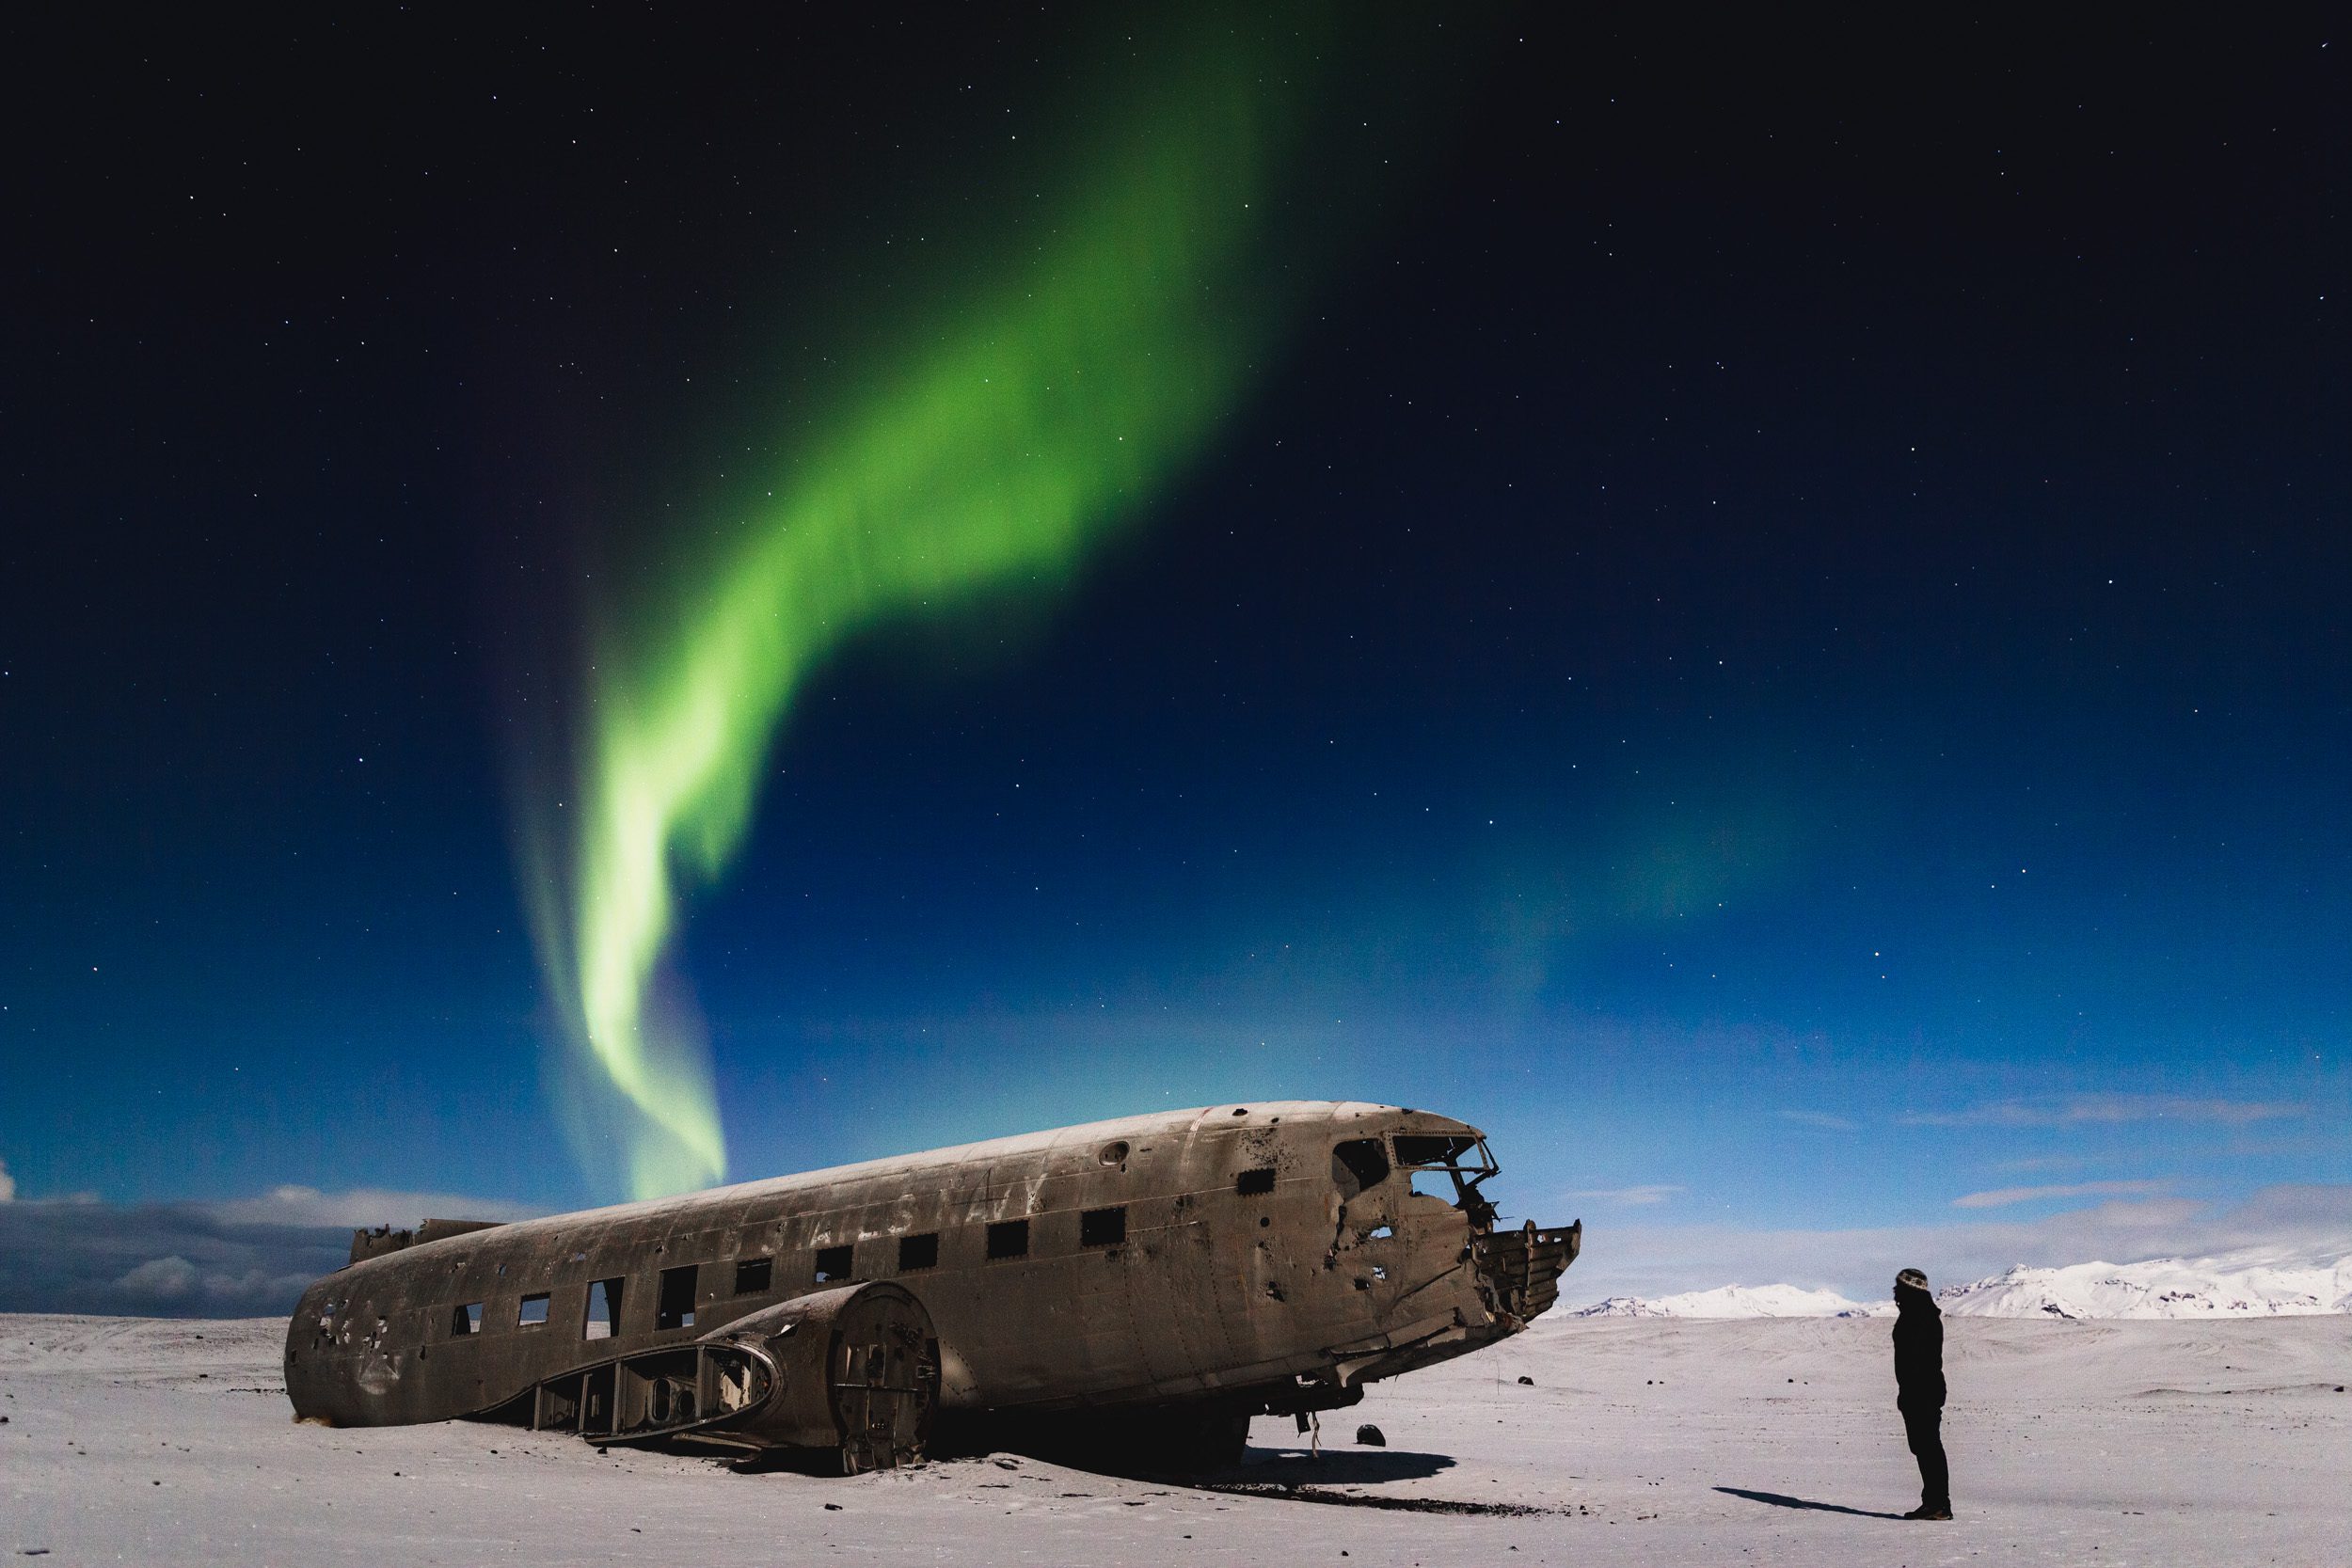
Back in 2013 I flew to Iceland on a very impulsive 3-day trip. Seeing the lights was my only goal. I spent my time during the day chasing a hole in the clouds. I drove until the sun set & ended up being lucky enough to capture this shot at this, now very famous, plane wreck. I faced the harsh winter conditions Iceland can throw at you: -15°C & the icy northerly wind blowing over the frozen sands – testing my endurance. Totally worth it when you’re able to capture a shot like this! (Canon 550D – ISO100 – F/1.8 – 8s)
Before we get started I want to make clear that this article is mainly about photographing the Northern Lights. If you would rather learn hands-on in the field, take a look at my photography workshops in Iceland. I won’t go into details about what exactly they are or what causes them to appear. However, I will go over some facts about the Northern Lights, explain why some urban myths are horribly far from the truth, list what equipment you need and how you can best set your camera.
Ready? Let’s dive right in!
What Should You Know About Photographing the Northern Lights Before Heading Out?
Before explaining how you can photograph the Northern Lights, there are some important things to know and forget. I have heard the craziest urban legends & myths surrounding the aurora. Some people seem to think there’s a connection between the outside temperature and Northern Lights activity, others believe the Lights appear at a certain time or even that they are visible when the midnight sun is shining bright. None of the previous statements are true but what is?
Here are a few things you should know before heading out:
-
The Northern Lights are only visible when the nights are dark enough. In Iceland this means that it’s possible to see them from mid August until the end of April. It is not possible to see them outside that period.
-
If it’s too cloudy, you probably won’t see the aurora because it takes place high above the clouds.
-
You can see the Northern Lights everywhere (no, you don’t necessarily need to go on a special tour). It’s even possible to see them from inside Reykjavík — if they are strong enough. Although having no light pollution around is always better of course.
-
Strong moonlight interferes with the ability to see the Northern Lights. If there’s a full moon, you’ll have a lot more difficulty seeing them compared to when there is no moon).
-
Even if the sky is clear, the nights are dark and there is no moonlight, there’s no guarantee that you’ll see them. It’s always possible there’s not enough solar activity going on during that night.
-
The Northern Lights are not active all the time, nor is the intensity of the light the same. They usually appear in spikes, increasing & decreasing in intensity.
-
There’s no precise time when you will see the Northern Lights. I have heard this statement many times before, even to the point where people were waiting inside a building for a certain time while the show was already ongoing.
-
The widely used Kp index is a pointless metric for northern lights chasers, which could potentially make you miss a potentially great display of the northern lights. More about what does matter below.
-
Find a good smartphone app which notifies you of when the aurora will be visible or most active. More about that below.
-
Generally, the most active aurora’s are seen around the equinoxes (end of August/September and March/early April).
-
The most important one of all: be patient & don’t give up after being outside for a short time!
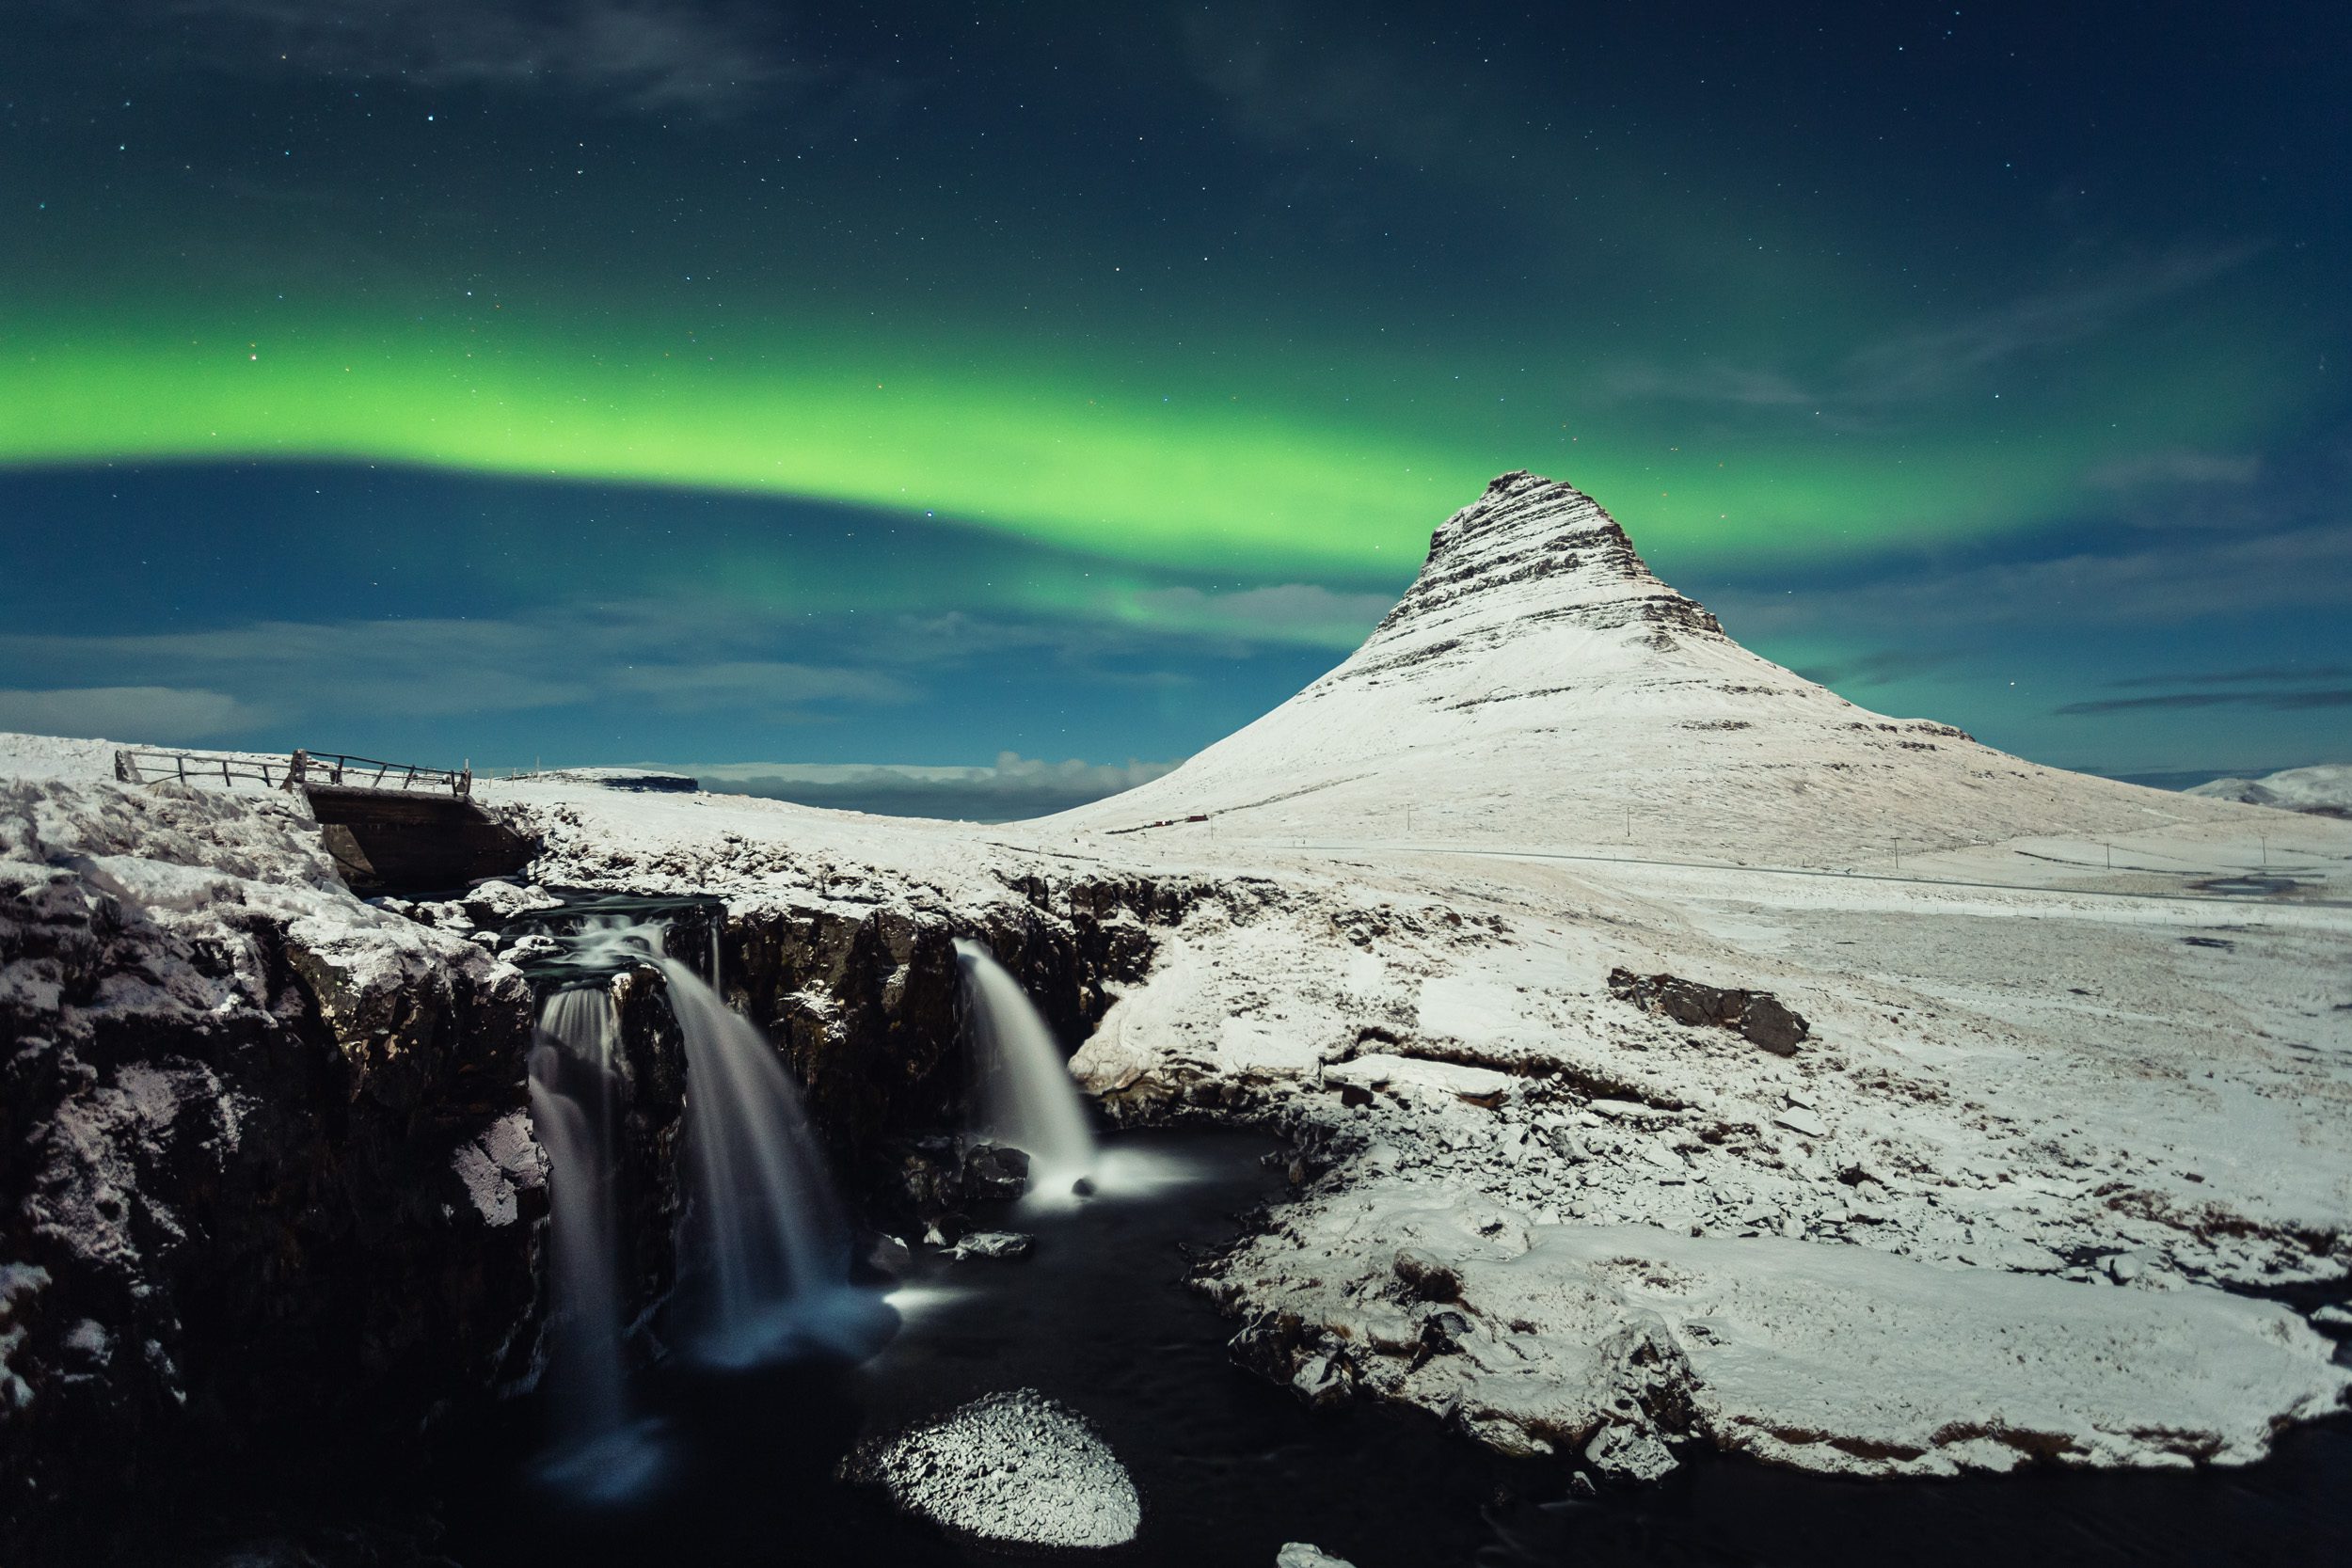
The Aurora Borealis above the most-photographed mountain in the world, Kirkjufell. This cone-shaped mountain is located in West Iceland and is on many photographer’s bucket list of photography. (Canon 6D — 20s — F/4 — ISO800)
When Is the Best Time to Photograph the Northern Lights?
In Iceland the northern lights are visible from mid August to late April, when the nights are dark enough. You cannot see them outside that window, no matter how strong the solar activity is, because the summer sky never gets dark enough. Within the season, the displays tend to be strongest around the equinoxes, roughly late August to September and March into early April.
There is no fixed time of night. The aurora can appear any time it is dark, so I watch the sky and a forecast app rather than the clock. On a good night I will check from dusk onward and stay out in spells, because the lights come in waves and the best burst often arrives when you have almost given up. Clear, dark skies away from city light give you the best odds, but a strong display is easily bright enough to shoot even from the edge of Reykjavík.
For how to read the forecast and plan a full aurora trip, see my Ultimate Guide To Chasing & Photographing The Northern Lights.
Are There Any Tools That Can Help You to Photograph the Northern Lights?
To make a good judgement on whether or not it is worth heading out so you can photograph the northern lights, there are some things that can help you.
For example, on the website of the Icelandic Meteorological Office (IMO), you can find a cloud coverage forecast that gives you some insight in the cloud coverage by the hour. On this forecast you can easily see if there will be a lot of clouds (or not) in the area you wish to photograph (dark green is really cloudy, white is clear skies). Additionally you can also find out when the sun sets and rises, when it’s supposed to be dark, … This page also points out what the forecasted strength of the aurora will be with the Kp index. However, the Kp index is an unreliable metric and I don’t really recommend basing any decision on it.
Today I am using an app called Hello Aurora. It’s available for both iOS and Android. The app shows actual live measurements and also shows you the activity map as displayed on spaceweather.com. You get a lot more information (such as solar wind speeds, solar wind density & IMF strength for example) which helps make a more reliable forecast. And it gives you push notifications on top of that so you get notified by others who see the northern lights! It has a very clear and comprehensive interface to make you understand what all the numbers and measurements mean. It’s also useful as it now combines cloud coverage with the map. Its newest addition is a kind of social network where other users can report they are seeing the aurora. This greatly helps you to know when you should head outside if you aren’t already.
If you combine both the cloud coverage map by IMO and the data from Hello Aurora, you’re all set to determine when it’s a good idea to head out.
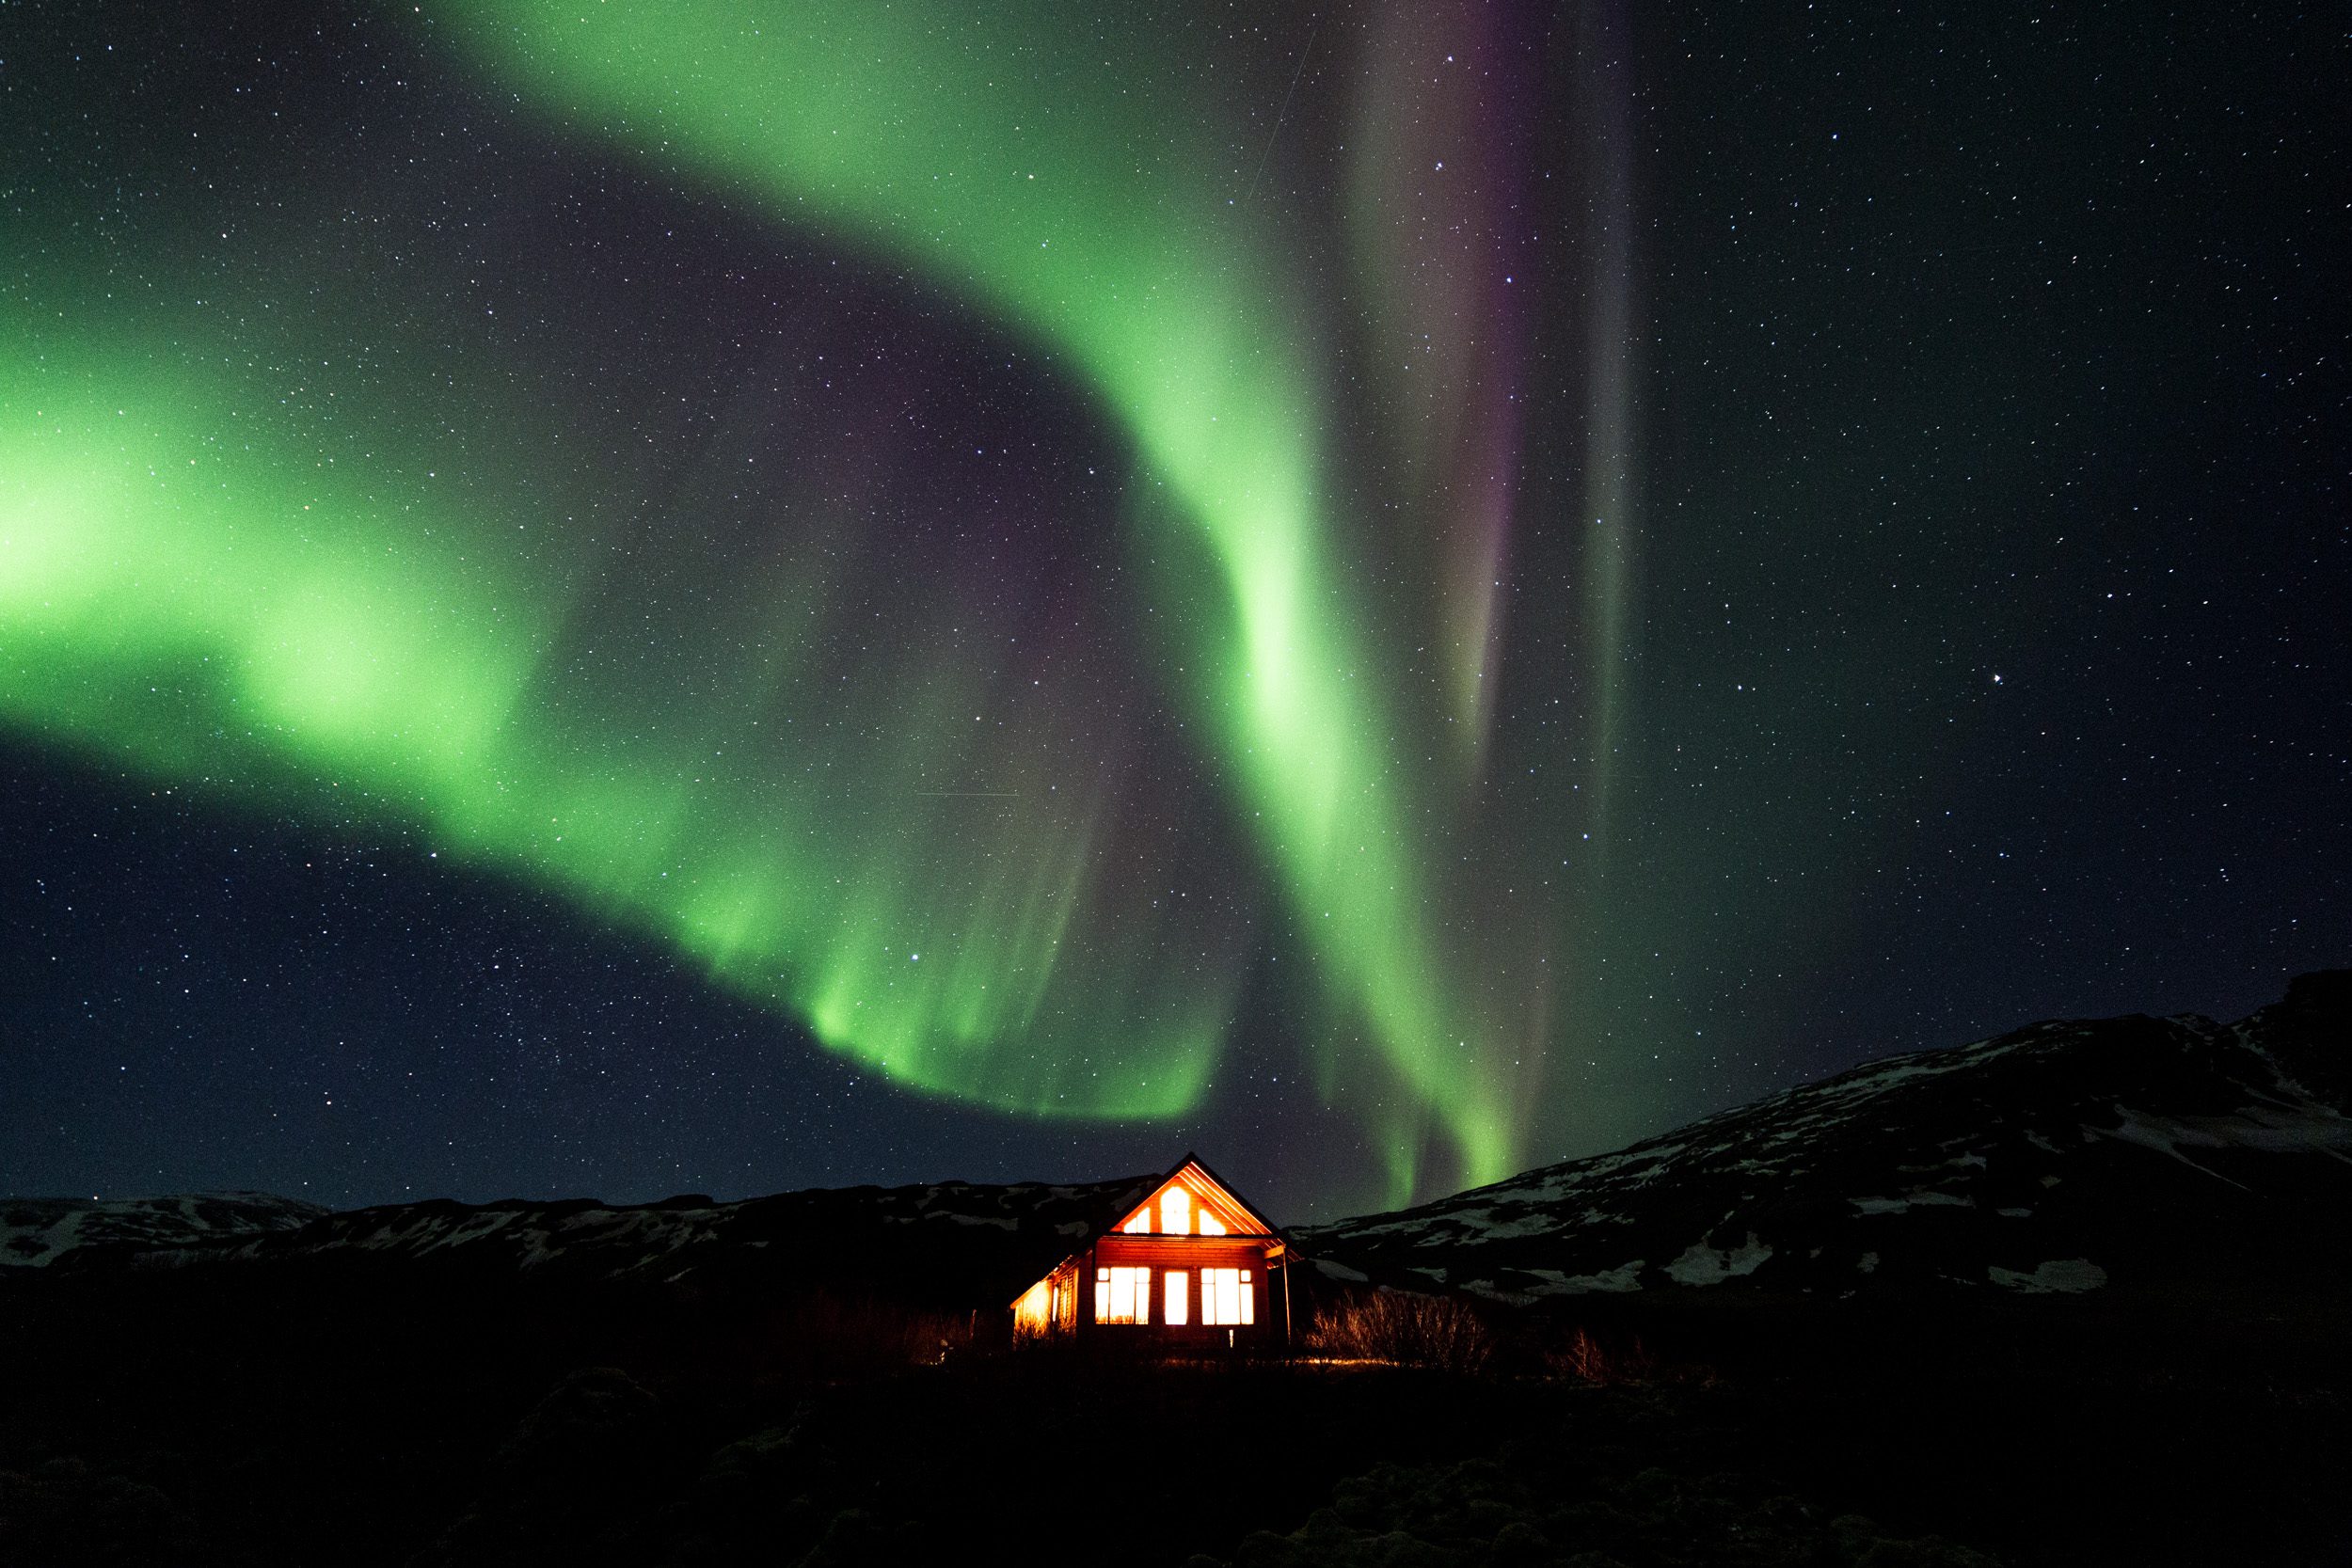
The northern lights above a summer house in the western part of Iceland. (Canon 6D — 6s — F/2.8 — ISO800)
What Equipment Do You Need to Photograph the Northern Lights?
Now that you know what to look out for, what kind of camera equipment do you need?
-
A tripod — this is absolutely essential equipment since you will be taken long exposure shots.
-
A camera that allows you to set everything manually
-
A remote control — this is not absolutely necessary. It makes your life easier but you could easily use the delayed shutter for it.
-
A wide-angle lens (preferably with an aperture of F/2.8 or F/4) — this is not absolutely necessary but it’s easier if you want to capture the scale of the Northern Lights. Also, a bigger aperture is always better but F/4 can also do the job.
-
Gloves, a hat and a wind-proof jacket — it can get cold waiting outside. Dress accordingly!
“So, that’s it?”. Yes, that’s all you need! I shot my first aurora photographs with the cheapest tripod, the cheapest DSLR, with one of the cheapest wide-angle lenses out there. It’s important to know that everything depends on the strength of the Northern Lights. If they’re really strong, you don’t need the best, most light-sensitive camera equipment. You only need to know how to use your camera.

The Northern Lights above a tiny island off the coast of Reykjanes Peninsula. (Canon 6D — 15s — F/2.8 — ISO800)
How Do You Set Your Camera to Photograph the Northern Lights?
Step 1: Mount Your Camera on Your Tripod, Hook Up a Remote & Choose a Composition
It’s really important to take your Northern Lights photos while your camera is mounted on a tripod. It’s impossible to shoot long exposure photographs while trying to hold still. Even the slightest movement can result in a blurry photo.
After it’s mounted you can hook up your remote control or set your camera with a delayed shutter. This will help in decreasing any possible movement.
After it’s mounted & you hooked up the remote, you choose the widest angle you can get on your camera and make a composition of your shot.
Step 2: Manually Focus to Infinity or Your Subject
The first thing you need to do, is set your camera or lens to manual focus and focus the lens to infinity or focus on the subject in the foreground that is important to you. You can always try to focus, with autofocus, on the moon or a star but most cameras won’t focus in such low light. If you are focusing on a specific subject in the foreground, you can also light it up with a strong flashlight.
A good thing to test in advance is whether your lens’ infinity marker is actual focused on infinity. Some lenses tend to not be fully focused on distant objects if you set it to infinity. Test this in a well lit area before making all your shots. It would be a huge disappointment if none of your shots were actually in focus.
Step 3: Set Your Camera to Manual (M)
Switch your camera to manual settings (usually marked with M). Set your aperture to the lowest number possible (this means your lens will be wide open), your ISO to 1600 and the shutter speed to 20 seconds. These are good settings to start with. I use these settings mainly to test how strong the aurora is and adjust the settings if needed.
Step 4: Adjust Your Settings Regularly
You will need to evaluate your shots and play around with the settings. If the aurora is overexposed, you want to dial down on ISO (lower ISO equals less grainy photos) and/or shutter speed (lower shutter speed will better freeze the movement). If it’s underexposed you do the opposite.
If you can increase the shutter speed, you will “freeze” the movement of the aurora (depending on how active it is), this will result in seeing the stripes that appear when you see the lights more. If your camera is not really producing a lot of grain at higher ISO’s, you can increase it so you can lower the shutter speed.
Depending on whether or not there is a lot of moonlight, you will need to adjust your settings accordingly. For example if there is a lot of snow, the moonlight will reflect a lot. This might mean you’ll have to lower the shutter speed and/or decrease the ISO. Moonlight also limits the visibility of the aurora.
Don’t forget that the Northern Lights increase & decrease in intensity. You will need to adjust your settings regularly!
Step 5: Enjoy!
Don’t forget to enjoy the show and look at up at the sky — not only through your lens!
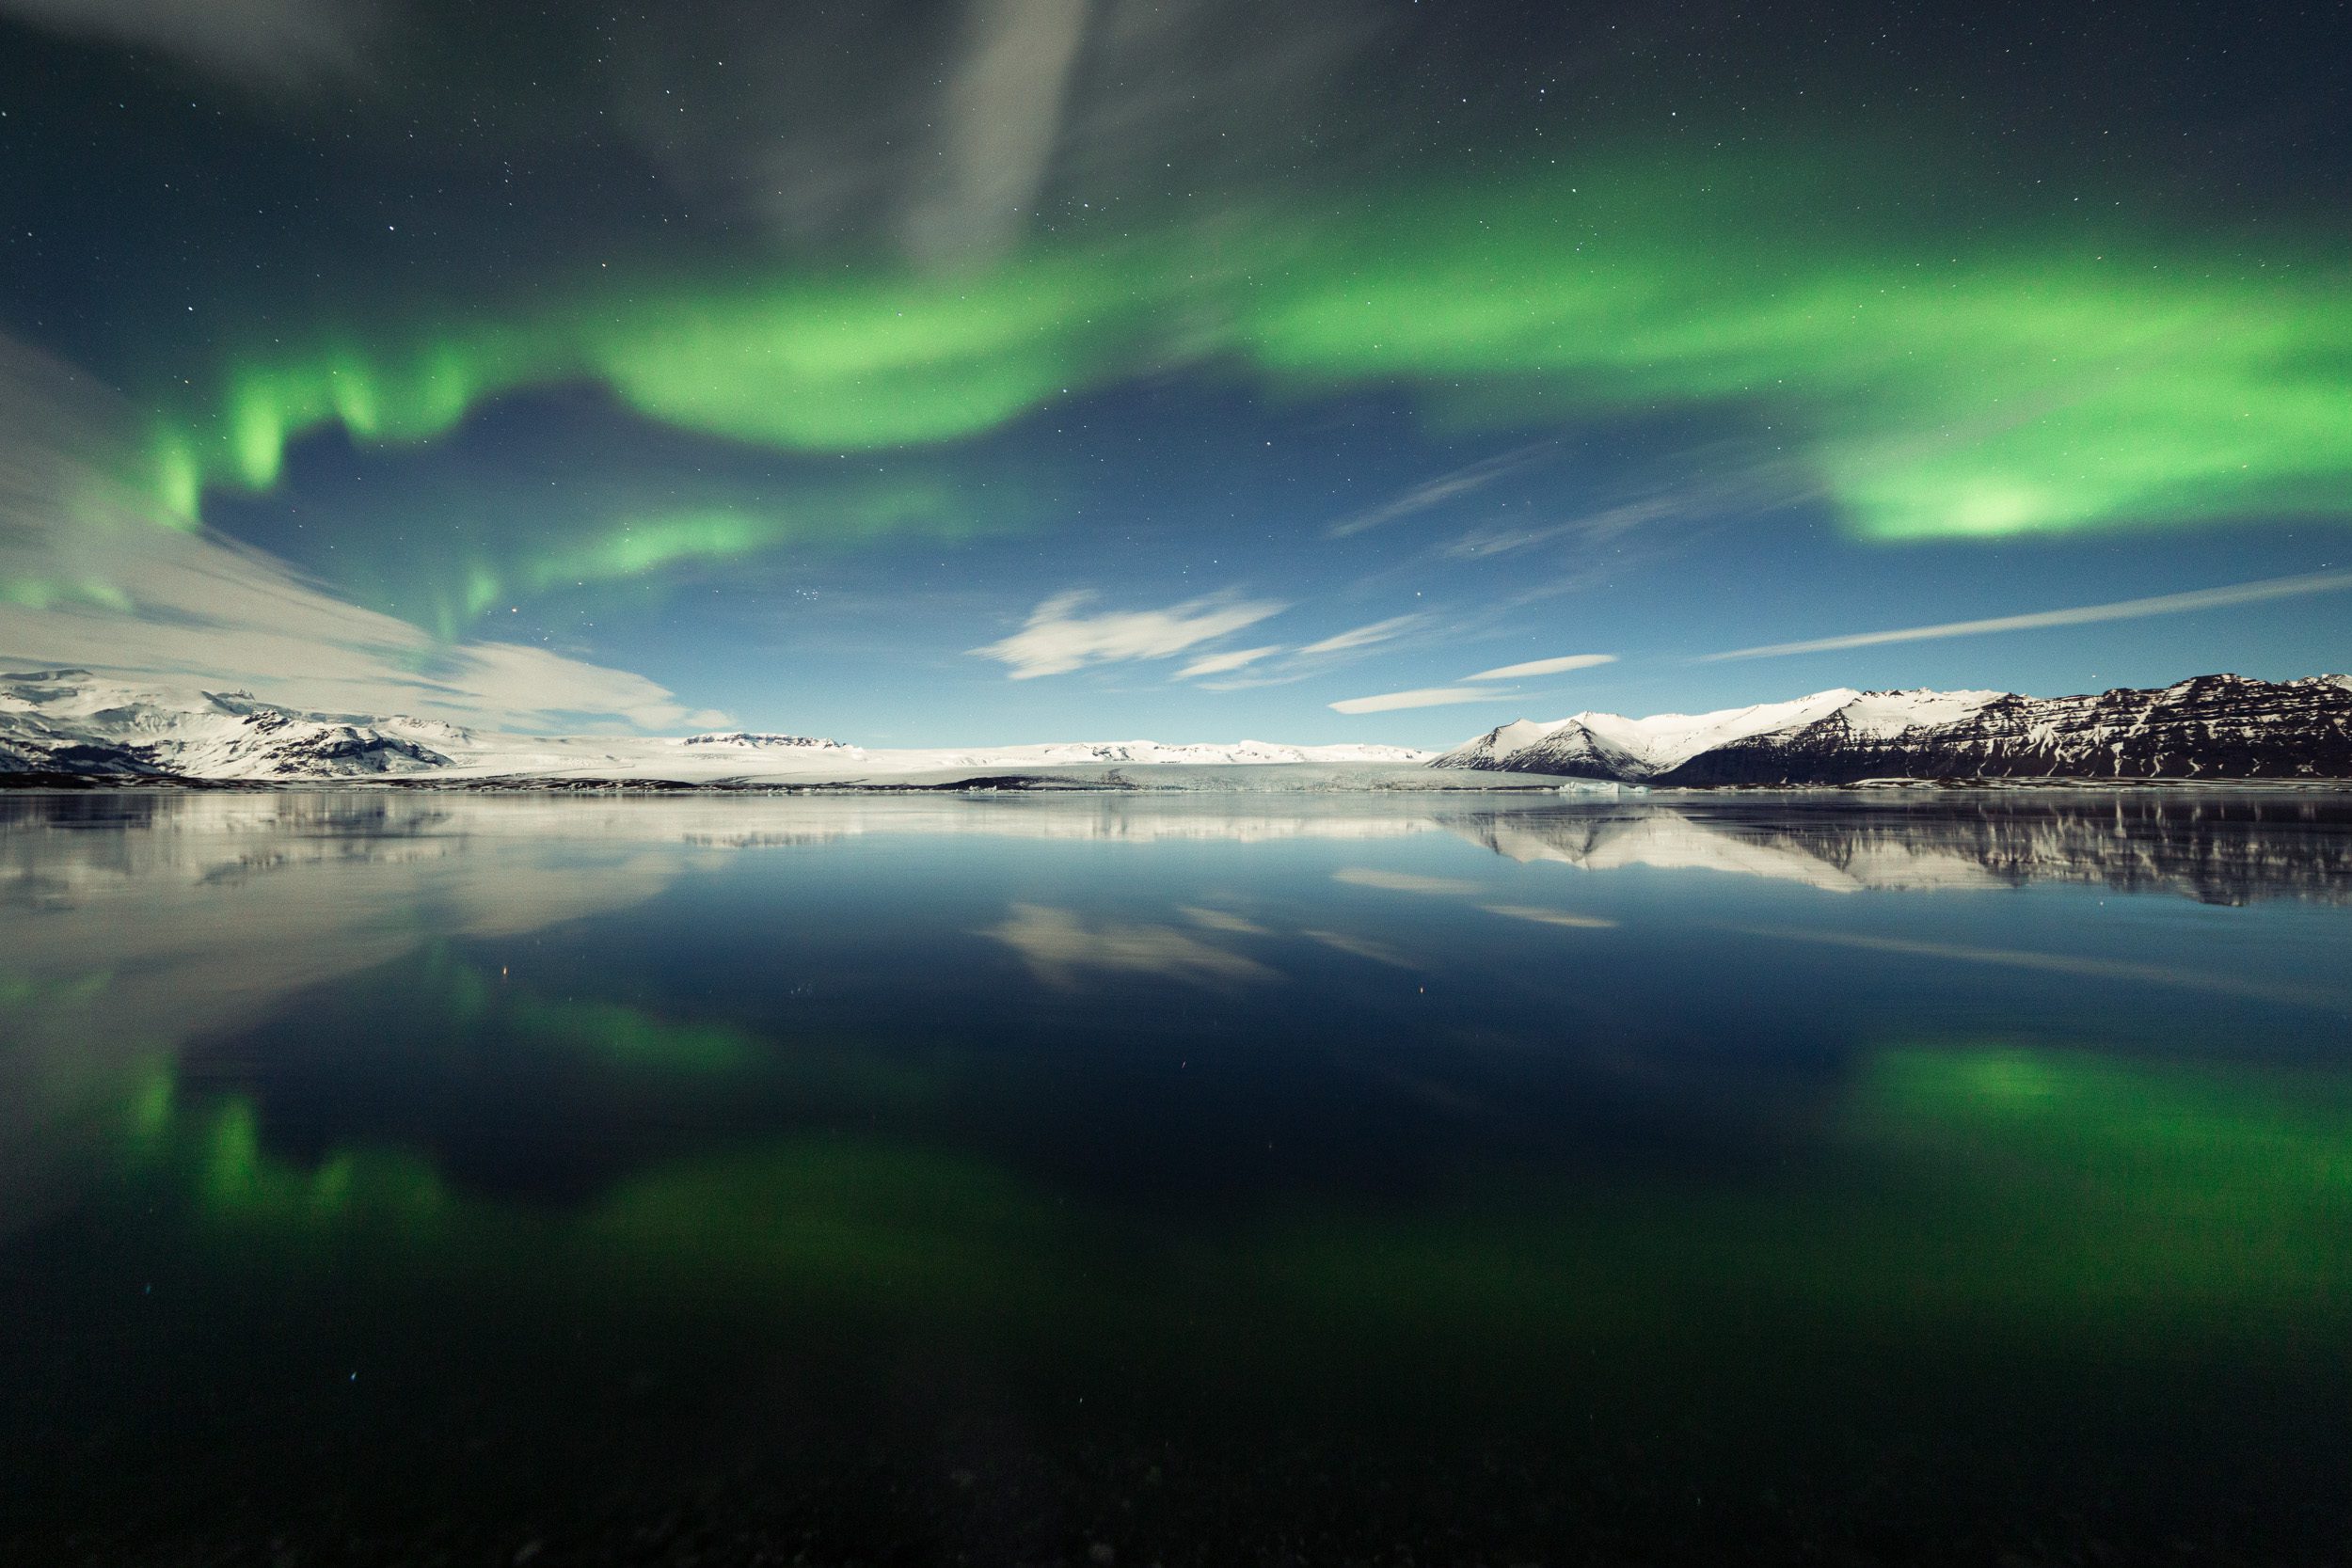
The Northern Lights above a semi-frozen lagoon. There were no icebergs close to the shore but this allowed for some beautiful reflections of the Northern Lights. (Canon 6D — 15s — F/2.8 — ISO800)
Where Should You Photograph the Northern Lights?
Good settings get you a sharp, well-exposed frame. They do not get you a good photo. To me, where you stand matters just as much as what you dial in, and it is the part most people skip. The biggest upgrade is to put something interesting in the foreground. A bare green sky looks incredible in person but flat on screen, so give the viewer something to look at besides sky: a mountain, a lone cabin, a friend with a head torch, and above all water. Still water doubles the aurora with a reflection, which is why so many of my favourite shots were made on the edge of a lagoon or a calm fjord.
Get away from town if you can. Light pollution washes out the faint detail, and the darker your sky, the more the camera picks up. But do not let a bit of glow stop you. A strong display is easily bright enough to photograph from the edge of Reykjavík, so if the aurora is going off, shoot where you are rather than driving for an hour and missing it.
Scout your spot in daylight. Finding a clean composition in the dark, in the cold, with the lights already dancing, is how you end up with a wonky horizon and a wasted display. I pick my foreground and framing before sunset whenever I can. The aurora often fills the whole sky, but it tends to be strongest toward the north, so I usually leave a bit more sky in that direction and let the foreground hold the bottom third.
For the planning side, when to travel, how to read the forecast, and where in Iceland to base yourself, see my Ultimate Guide To Chasing & Photographing The Northern Lights.
Water is the cheat code for aurora foregrounds. A calm pool or a wet beach doubles the lights in the reflection. This is Vestrahorn mirrored in the sand at Stokksnes.

The aurora over Vestrahorn, mirrored in the wet sand at Stokksnes in south-east Iceland.
How Do You Edit Northern Lights Photos?
Shoot RAW. It is the one choice in the field that gives you room to fix white balance and recover detail later, and with the northern lights you will want both. A JPEG locks in the choices the camera makes in the dark, and it makes them badly.
Start with white balance. Auto white balance tends to throw an orange cast over a night sky, so I pull the temperature down to around 3500 to 4500K, until the sky reads as a deep natural blue and the green stays clean. After that it is gentle work. Lift the shadows a little to show the foreground, but watch for noise as you do, and add noise reduction to taste rather than by default.
The mistake I see most often is overcooking it: pushing the green until it glows radioactive, crushing the blacks, hammering the dehaze slider. The aurora is already dramatic, so it does not need the help. A bit of contrast, a careful hand on saturation, and stars that still look like stars will get you a photo that looks like what you actually saw. That is the whole point.
Keep it honest in the edit. Cool the white balance, ease off the green, and leave the stars as points of light. The goal is the scene you stood in, not a poster of it.

Northern lights over the ice at Jökulsárlón glacier lagoon, kept natural in the edit.
Frequently Asked Questions
What ISO Should I Use for Northern Lights Photography?
Start at ISO 1600 for most northern lights photography. Drop to 800 if the aurora is very strong or the moon is bright. Push higher than 1600 only if the aurora is faint and your camera handles noise well at high ISO. A lower ISO produces cleaner, less grainy images.
What Shutter Speed Is Best for the Northern Lights?
A 20-second exposure is a good starting point for the northern lights. Drop to 5 to 10 seconds if the aurora is moving quickly to freeze the “dancing” detail. Extend up to 30 seconds for faint, slow-moving glows. Adjust based on what the aurora is doing at the moment.
What Aperture Should I Use for the Northern Lights?
Use the widest aperture your lens allows, ideally f/2.8 or wider. F/4 also works but means you will need a higher ISO or longer shutter speed to compensate. A wide aperture lets more light hit the sensor, which is essential for capturing the aurora cleanly.
How Do I Focus My Camera on the Northern Lights?
Switch your lens to manual focus and either point at a bright star (zoom in on the live view to confirm sharpness) or set the focus ring to infinity if your lens has a reliable infinity mark. Autofocus rarely works in the dark, and a misaligned infinity mark can leave every shot soft.
What Gear Do I Need to Photograph the Northern Lights?
The essentials are a camera with a manual mode, a sturdy tripod, and a wide lens with a fast aperture (f/2.8 is ideal, f/4 works). A remote release or the 2-second timer helps avoid shake, and spare batteries matter because the cold drains them fast. You do not need expensive kit. When the aurora is strong, a basic camera and a cheap wide lens will capture it perfectly well.
Can You Photograph the Northern Lights With Any Camera?
Almost any camera that lets you set ISO, aperture, and shutter speed manually can photograph the northern lights, including entry-level DSLRs and mirrorless bodies. Full-frame cameras with strong high-ISO performance make faint displays easier, but they are not required. For phones specifically, see my iPhone northern lights guide.
When Is the Best Time to Photograph the Northern Lights?
In Iceland the northern lights are visible from mid August to late April, when the nights are dark enough, and they cannot be seen outside that window. There is no fixed time of night, so watch the sky and a forecast app rather than the clock. Displays are usually strongest around the equinoxes, in September and March, on clear, dark nights with enough solar activity.
Discover Jeroen’s Photo Workshops in Iceland, Greenland & Beyond
Ready to take your photography to the next level? Join me, Jeroen Van Nieuwenhove, on unforgettable photo workshops in Iceland, Greenland, Antarctica and other exciting destinations. Whether your passion is wildlife photography, bird photography, landscape adventures, or mastering drone photography, each workshop is designed to give you hands-on guidance in some of the world’s most spectacular locations.
From puffins in the midnight sun to Arctic foxes in the wild, from glaciers and volcanoes to dramatic coastlines seen by drone – these journeys are more than workshops; they’re once-in-a-lifetime experiences. Group sizes are kept small, ensuring personal mentoring and plenty of shooting opportunities.
Looking for something specific? Check out Jeroen’s…
- Wildlife & Bird Photography Workshops (Puffins, Arctic Foxes)
- Drone Photography Workshops
- Photo Workshops in Iceland
- Photo Workshops in Greenland
- Photo Workshops in Antarctica
Spots are limited – secure your place today!
Are You Looking For A Specific Photo Workshop?
All Upcoming Photography Workshops With Jeroen
Explore all upcoming photography workshops with Jeroen and take your skills to the next level in some of the world’s most extraordinary locations. From the volcanic landscapes of Iceland to the ice-filled fjords of Greenland and the wildlife-rich polar regions such as Antarctica, each workshop is designed to help you grow creatively while experiencing unforgettable moments in the field. Browse all upcoming departures below and find your next adventure!
LAST SPOT
OPEN FOR BOOKINGS
LAST SPOTS
OPEN FOR BOOKINGS
WAITLIST
WAITLIST
WAITLIST
WAITLIST
WAITLIST

WAITLIST
WAITLIST
What Previous Participants Shared About Their Experience
Choosing the right photography workshop is about more than just visiting iconic locations. It’s about experience, safety, timing, and personal guidance. Below you’ll find honest reviews from photographers who have joined me on landscape, wildlife & drone photo workshops in Iceland, Greenland and other locations. These testimonials reflect real experiences in small groups, hands-on instruction in challenging conditions, and the level of care Jeroen aims to bring to every workshop.
These reviews are verifiable on Jeroen’s public Google Business profile.


")


")


Support Jeroen’s Work
As an independent photographer, Jeroen partially relies on your support to keep producing worthwhile content such as blogs, photographs, books and much more. If you want to support his work, it is possible to do so by buying his e-books & books or prints.
You can also sign up to the newsletter to stay up to date on new blog posts, projects, workshops and other interesting information.
Thank you for considering!


Thank you for your previous answer, wich nikkor 16mm lenses would you recommend??
I don’t use Nikon so I am not familiar with their lenses. However, there is a great third party lens for Nikon which you can use: the Samyang AF 14mm F2.8 F lens. It’s one of the best lenses for aurora shooting.
Do you think it’s possible to use the nikon z50 with a nikkor 24-50mm F/4-6.3 to capture the northern lights with the settings you suggested above?
Hi Luiza, it all depends on how intense the northern lights are of course but I would definitely try with the suggested settings and then adjust as needed. However, if you have access to a wider lens, something around 16mm, you will have much better shots if the aurora is bigger and vivid.
Is a 1.8 aperture lens too wide to photograph the aurora?
A large aperture will be beneficial to you. I wouldn’t say it’s too wide. However, there is a down side to shooting at F1.8 which is the shallow depth of field. This means that if you intend to shoot a scene with a foreground, you will either lose sharpness in the aurora or in the foreground – depending on what you focused on. This could be solved by using a smaller aperture & focusing on the hyperlocal distance or by focus stacking.
Thank you for your article, photos are amazing! Someone who has seen the Northern Lights told me that the colour is not as vivid to the human eye as it appears on the camera? Is this true and if so do you know why?
They can be but, more often than not, they are greener on photographs than in real life. It kind of depends on a number of things. Aurora photos are usually saturated to create a better effect when the lights were not as strong. Some photographers also create a composite image out of different exposures, which generally creates a greener-looking end result. And of course, the longer your exposure, the greener they will become. But, it is definitely possible to see them very green and purple if the solar activity is very strong but those conditions do not happen very often. In that case, you won’t need very long exposure times.