Yes, you can photograph the Northern Lights with an iPhone, and get surprisingly good results using just the default Camera app and Night mode. Here are the exact steps I use in Iceland:
- Mount your iPhone on a tripod or rest it on something completely stable.
- Open the default Camera app and point it at the aurora.
- Wait for the Night mode icon (a yellow half-moon) to appear automatically in low light.
- Tap the Night mode icon, then drag the slider all the way to the right for the longest exposure (usually 10 to 30 seconds).
- Use the main 1x lens, avoid digital zoom, and tap the shutter, staying still until the exposure completes.
Most people trying to photograph the Northern Lights (or Aurora Borealis), and even the Southern Lights (or Aurora Australis), try doing that with the only camera they own: the smartphone in their pockets. Because of that, I decided to write this article explaining how you can photograph this beautiful natural phenomenon using an iPhone, with the default Camera app, while also giving you a few tips to get the best result. Don’t worry: it’s easy and straightforward!
Note: If you want to learn how to photograph the northern lights using a camera, I have a much more detailed guide explaining everything step by step. Or if you want to learn even more about chasing & photographing the northern (or southern) lights, make sure to check out my Ultimate Guide To Chasing & Photographing the Northern (& Southern) Lights.
What Should You Know About Chasing The Northern Lights
Before I can explain how you can photograph the Northern Lights using your iPhone, there are a few important things to know:
- The Northern Lights are only visible when the nights are dark enough.
- If it’s too cloudy, you probably won’t see the aurora as it takes place high above the clouds.
- To get the best results, you need to be away from light pollution.
- Strong moonlight can interfere with the ability to see the Northern Lights. If there’s a full moon, you’ll have a lot more difficulty seeing them compared to when there is no moon.
- Even if the sky is clear, the nights are dark and there is no moonlight, there’s no guarantee that you’ll see them. It’s always possible there’s not enough solar activity going on during that night.
- The Northern Lights are not active all the time, nor is the intensity of the light the same. They usually appear in spikes, increasing & decreasing in intensity.
- There’s no precise time when you will see the Northern Lights.
- The Kp index is a pointless metric for northern lights chasers, which could potentially make you miss a potentially great display of the northern lights.
- Use a good smartphone app which notifies you of when the aurora will be visible or most active.
- The most important one of all: be patient & don’t give up after being outside for a short time!
If you want to learn even more, make sure to check out my Ultimate Guide To Chasing & Photographing the Northern (& Southern) Lights.
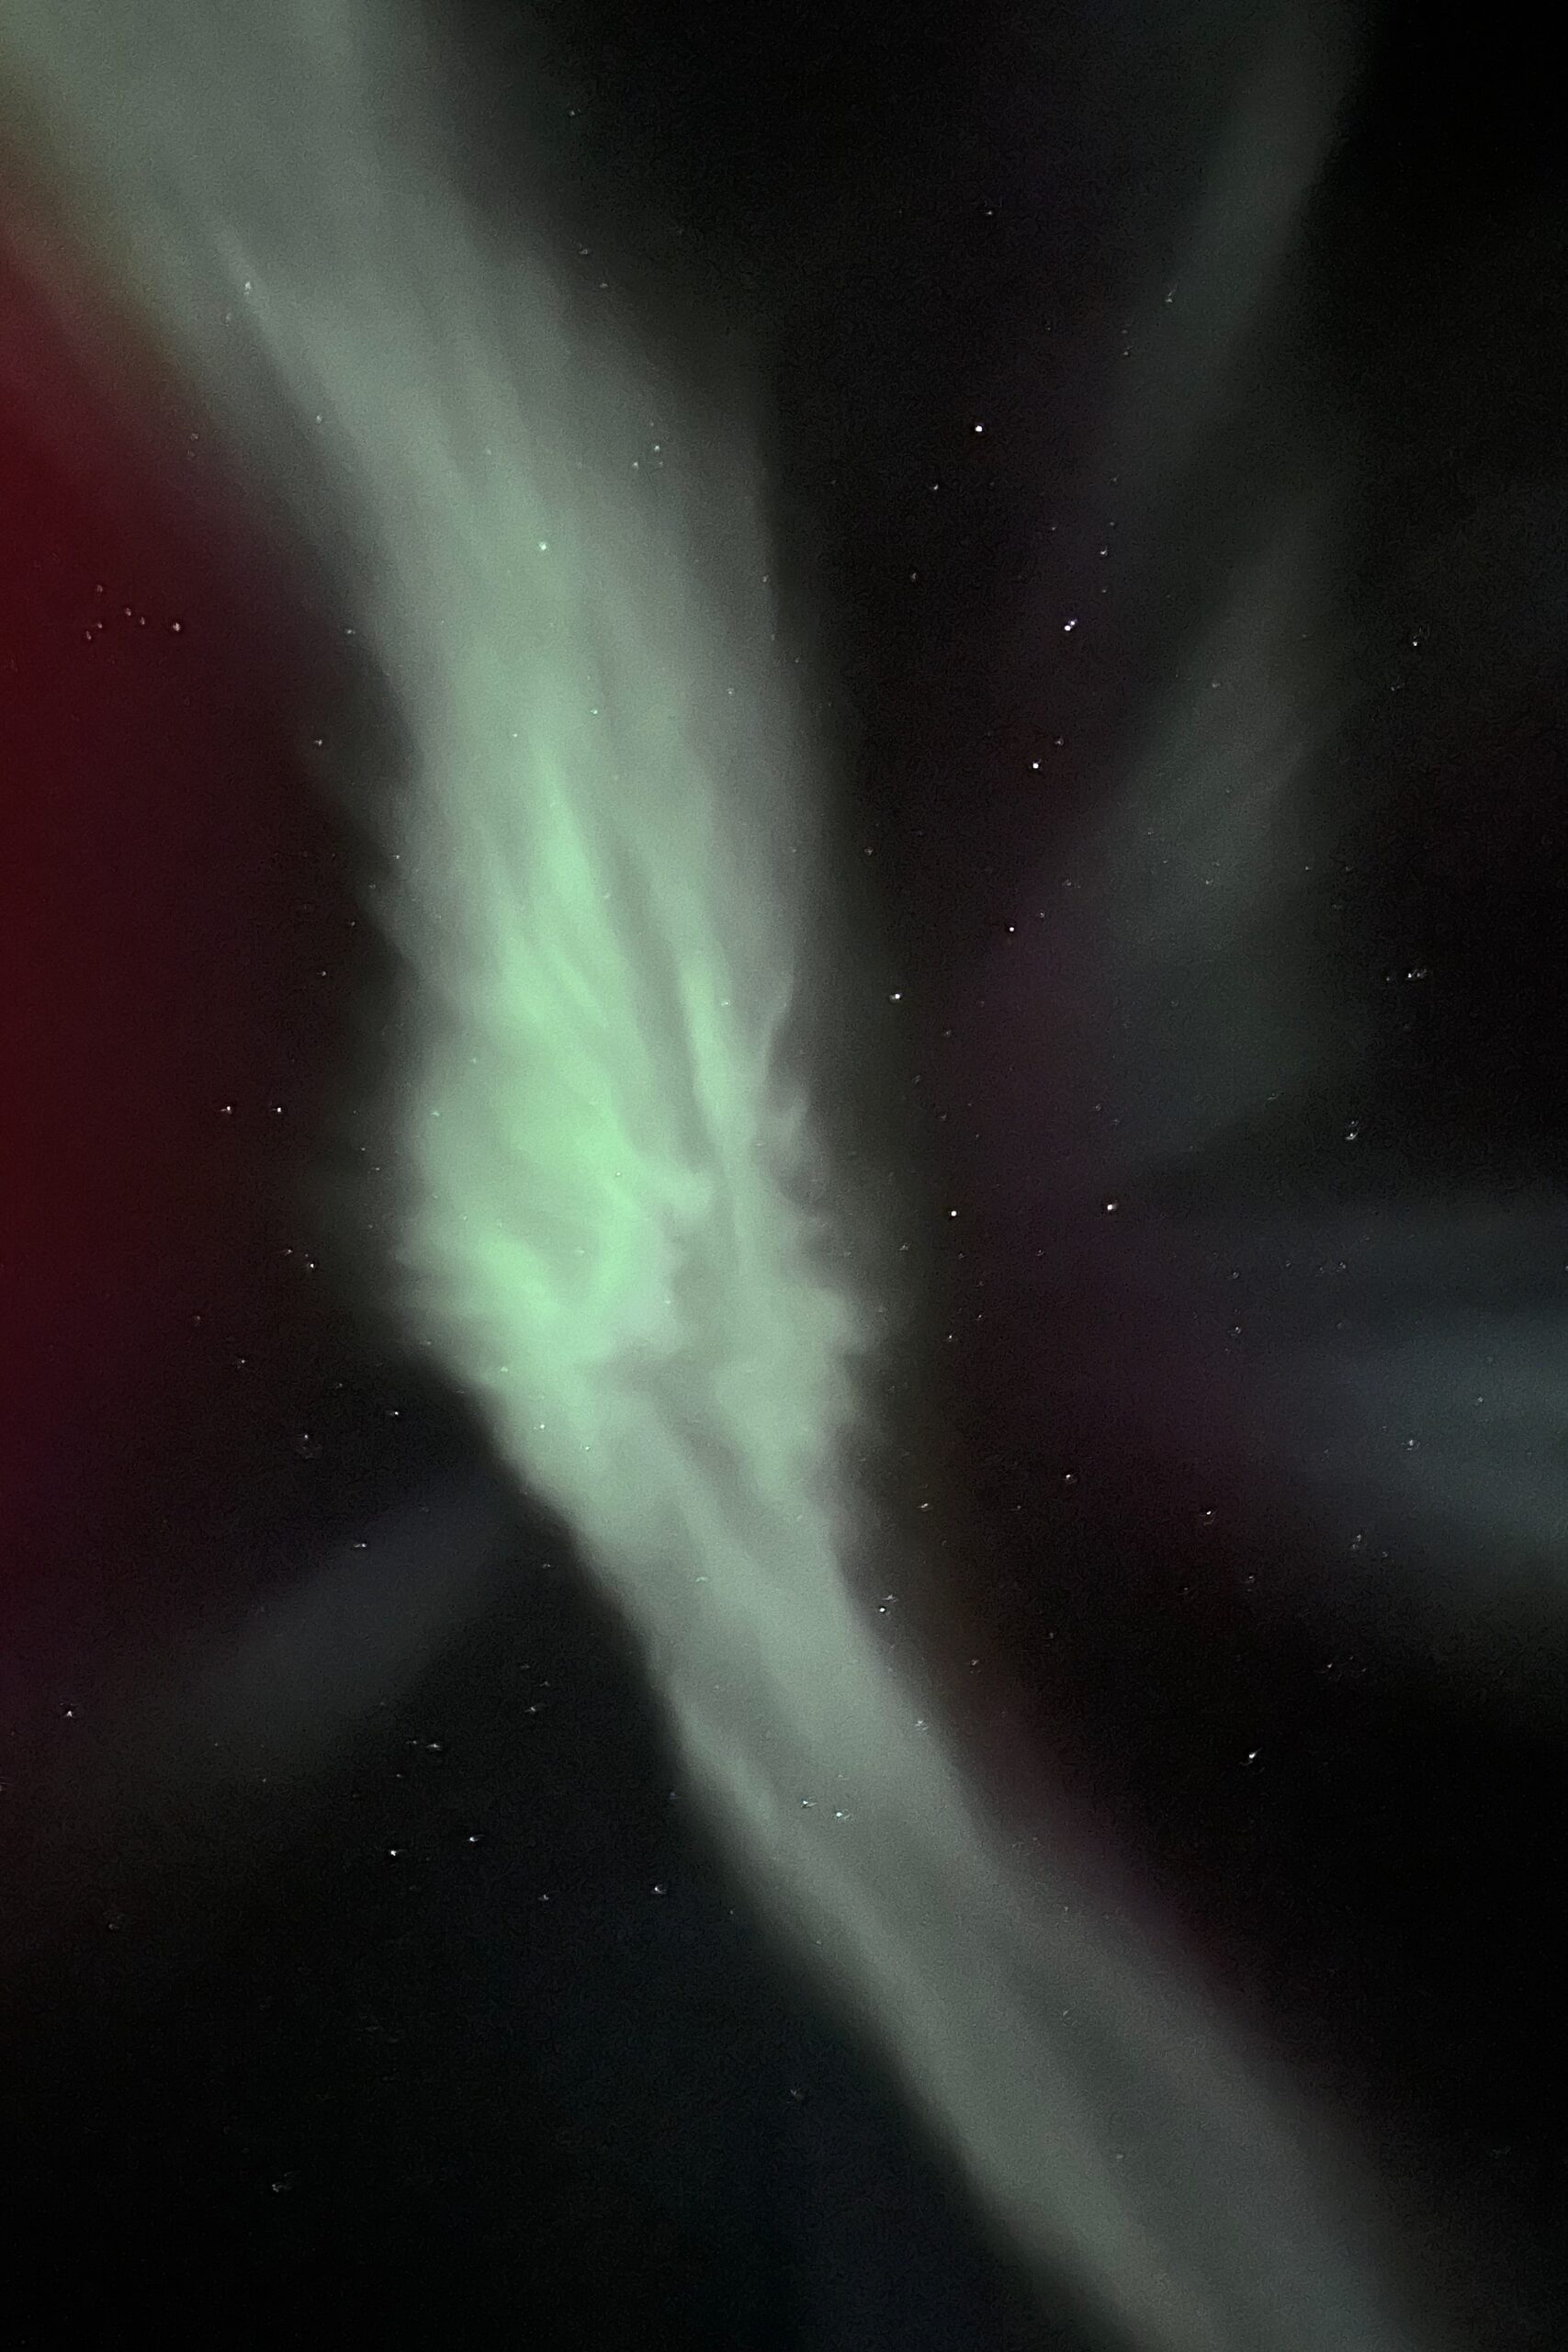
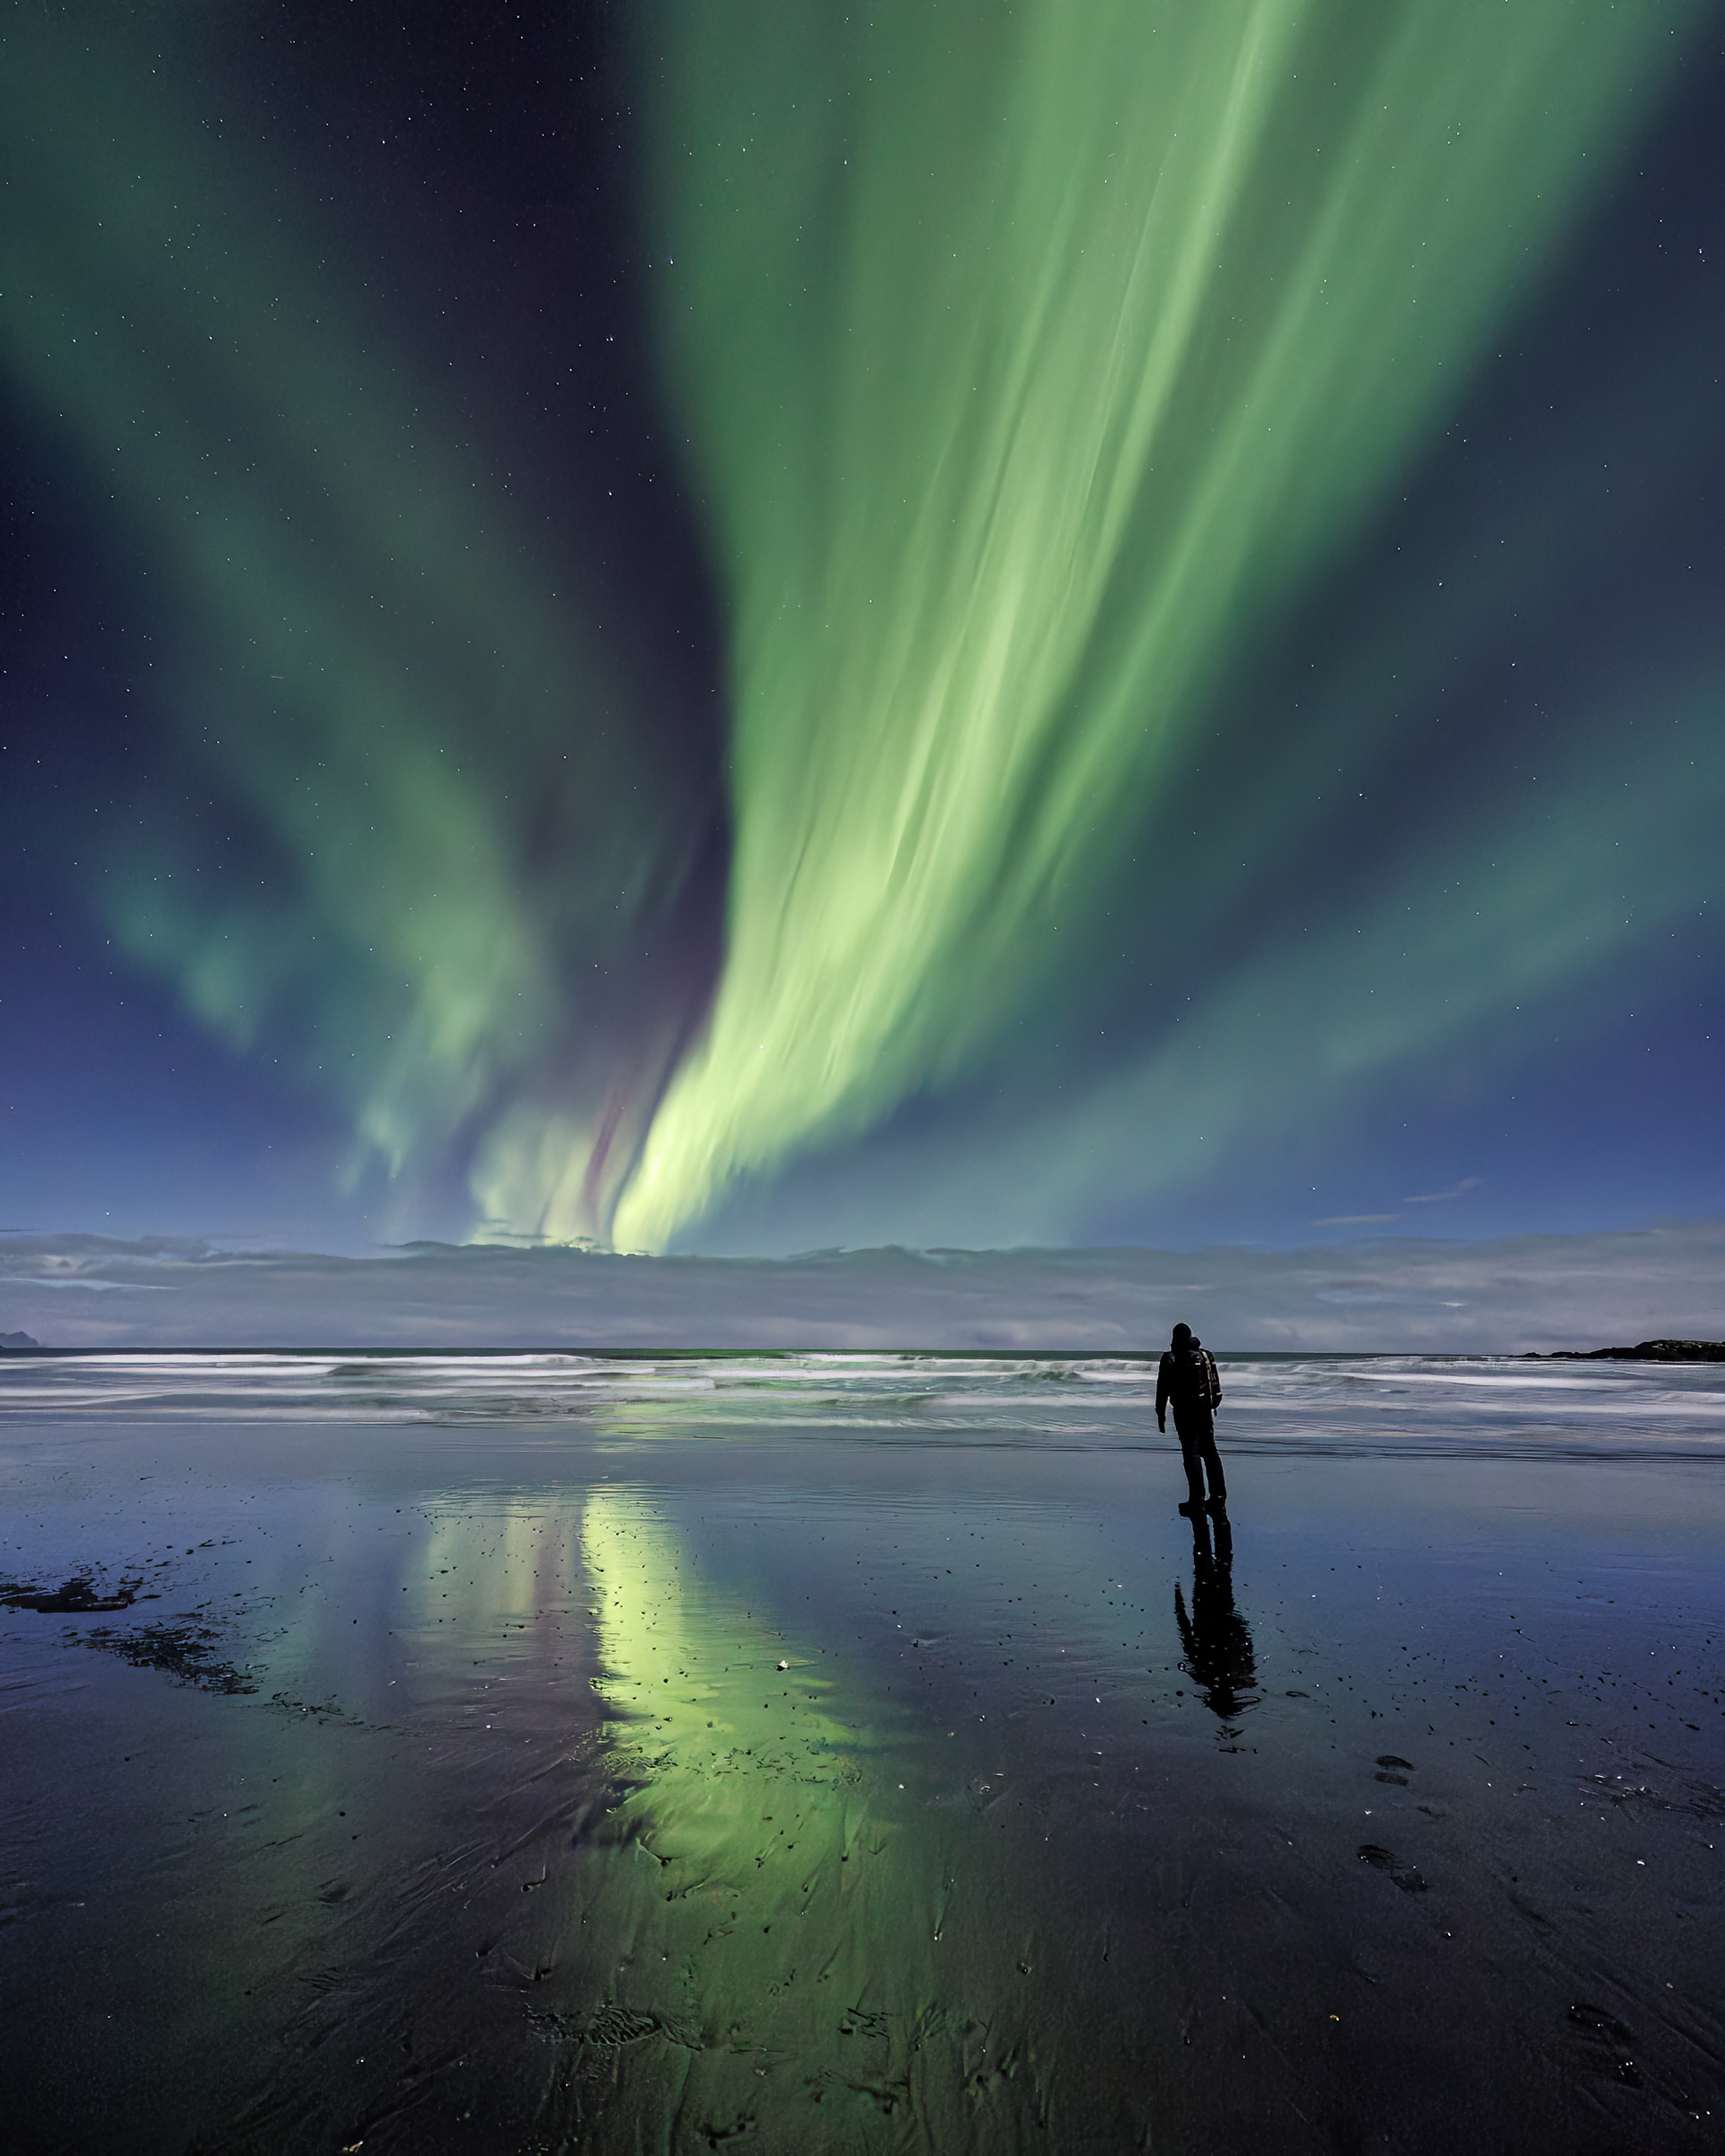
I captured this really active aurora borealis, which was dancing straight above my head, using my iPhone 13 Pro handheld.
Which iPhone App Should I Use To Track & Chase The Northern Lights?
The best available (& free) iPhone app today is Hello Aurora. It’s available for iOS, iPadOS, macOS and Android. Hello Aurora shows actual live measurements and also shows you the activity map as it is displayed on spaceweather.com. You get a lot more information (such as solar wind speeds, solar wind density & IMF strength for example) which helps make a more reliable forecast.
On top of that, it gives you push notifications so you get notified by others who are currently seeing the northern lights! That last feature I have found to be extremely useful if I don’t want to stay outside in the cold. Finally, Hello Aurora has a very clear and comprehensive interface to make you understand what all the numbers and measurements mean. It’s also useful as it combines cloud coverage with the map.
While there are many other apps available, I have found that there is no other app that is as reliable or contains the same level of information.
Hello Aurora is, by far, the best smartphone app to use when chasing the northern lights. It contains all relevant and important information while it also has a ‘social media’-like notification feature.
Can An iPhone Really Capture The Northern Lights?
Yes, you can photograph the Northern Lights with an iPhone but it comes with limitations. Modern iPhones have become surprisingly capable in low light, especially thanks to Night mode. When the aurora is strong and active, your iPhone can capture the colors and even some structure in the movement. On weaker nights, though, the results will be much more subtle than what your eyes see.
The key thing to understand is this: your iPhone relies heavily on computational photography. It combines multiple exposures to create a brighter image, but it cannot match the light sensitivity and control of a dedicated (semi-) professional camera. That said, with the right technique and realistic expectations, you can absolutely come away with beautiful aurora photos using just your phone, especially during strong displays in places like Iceland.

A (semi-)professional camera will always be able to capture better and higher quality images then your phone but that doesn’t mean you can’t get good results from using your phone.
What Do I Need To Photograph The Northern Lights With My iPhone?
Now that you know what to look out for, what do you minimally need to capture the northern lights with your iPhone?
- An iPhone that supports ‘Night Mode’ is highly recommended. This special camera mode is available on every iPhone since iPhone 11.
- The free Hello Aurora application.
While you can do handheld iPhone shots, without any additional equipment, there are a few things that make your life easier:
-
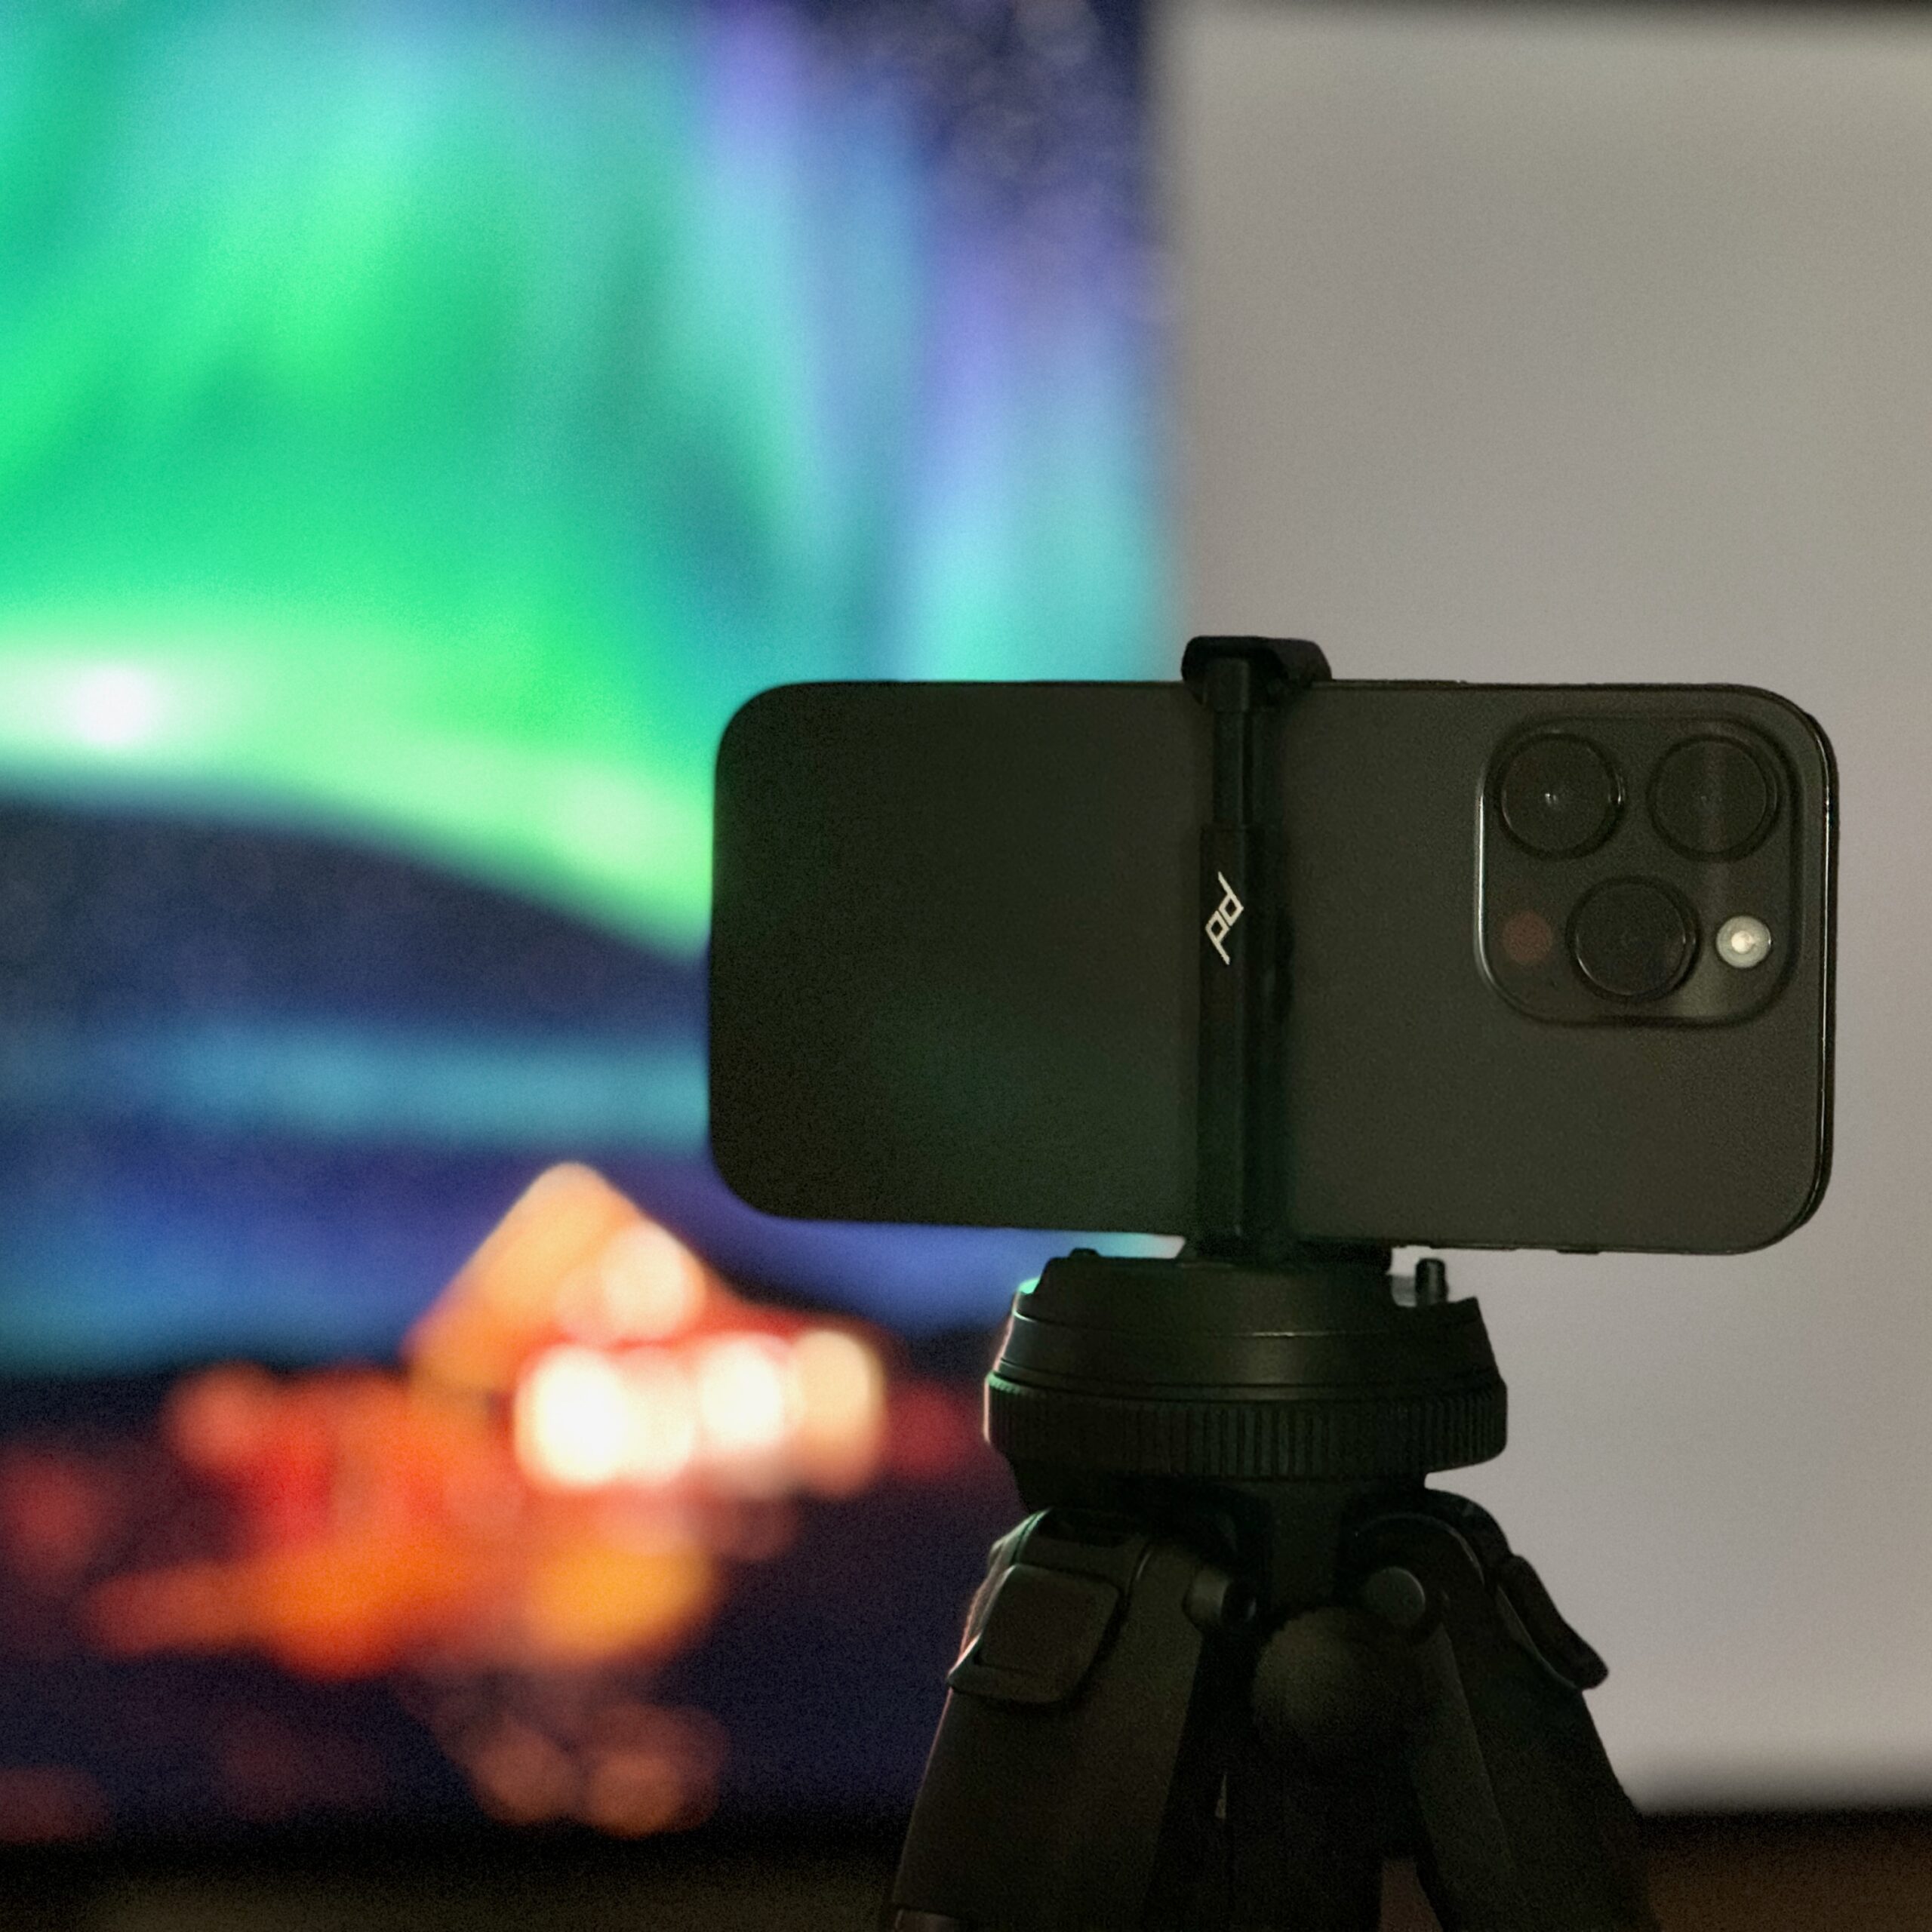
A sturdy tripod is needed to get the best and cleanest results. Alternatively, you can mount your iPhone on a fixed surface.
-
An Apple Watch to remote trigger your iPhone. While this is not absolutely necessary, it prevents accidental shaking and vibrations.
While you can take photographs of the northern lights using your iPhone handheld, stabilising your phone on a tripod will always give you better results.
Which iPhones Work Best For Aurora Photography?
Not all iPhones perform equally when it comes to photographing the Northern Lights.
In general, you’ll want an iPhone with Night mode, which was introduced with the iPhone 11 and improved significantly in later models. Newer devices like the iPhone 13 Pro, iPhone 14 Pro, and iPhone 15 Pro perform noticeably better thanks to improved sensors and image processing.b If you’re using an older iPhone without Night mode, capturing the aurora becomes much more difficult and often requires third-party apps with manual exposure control.
Do You Need A Special App Or Is The Default Camera Enough?
For most situations, the default iPhone camera app is more than enough. Apple’s Night mode does a very good job of automatically adjusting exposure, stacking images, and producing a clean result – all without needing manual settings. For beginners, this is by far the easiest and most reliable way to photograph the Northern Lights.
That said, third-party apps can give you more control. Apps like Halide allow you to manually adjust shutter speed, ISO, and focus, which can be useful in more challenging conditions. In practice, though, manual control on a smartphone has limits. Even with apps, you’re still working with a small sensor, and pushing settings too far often results in noisy or blurry images.
My advice: start with the default camera. Only experiment with apps once you understand the basics and want more control.
How Can I Photograph The Northern Lights With My iPhone?
Photographing the northern lights using your iPhone is quite easy. Below I have detailed the approach in a step-by-step manner.
Step 1: Mount Your iPhone On A Tripod (Or A Fixed Surface)
While it is possible to take handheld long exposures with an iPhone, you will get the best & clearest results using a tripod. Even the slightest movement while taking your photograph can result in a blurry photo. After you mounted the tripod, you can use your Apple Watch’s remote camera functionality to photograph without touching your phone. This will help in decreasing any possible movement. If you do not have access to a tripod, try putting the iPhone on a fixed surface.
Step 2: Make Sure To Use The 1x Lens
Many iPhones these days have multiple camera modules and lenses. The lens with the best low light capabilities is by far the 1x wide-angle lens. This is true for every iPhone on the market today. While you could use any lens on your iPhone, it is highly recommended to use the one with the best low light capabilities.
Using a tripod, or stabilising your phone well, means you will get sharper and clearer images from your iPhone.
Step 3: Switch On The Camera App’s ‘Night Mode’
Open the Camera application on your iPhone and enable ‘Night Mode’ (the moon icon) if it hasn’t activated automatically. Usually, if the Camera app detects it is dark, it will automatically switch it on. If it hasn’t, you can enable it at the top left by pressing the moon icon.
What is ‘Night Mode’? Night Mode allows you to take long exposure photographs to get the most out of low light situations. Using clever computational photography and the phone’s gyroscope, it will even allow you to do handheld long exposures.
Step 4: Frame Your Photograph
Decide on a composition! Traditionally, aurora shots include minimal foreground so the focus is mostly on the northern lights themselves. If the northern lights appear more directly above you, you can get the better results by placing your iPhone fairly low to the ground and tilting the phone upwards.
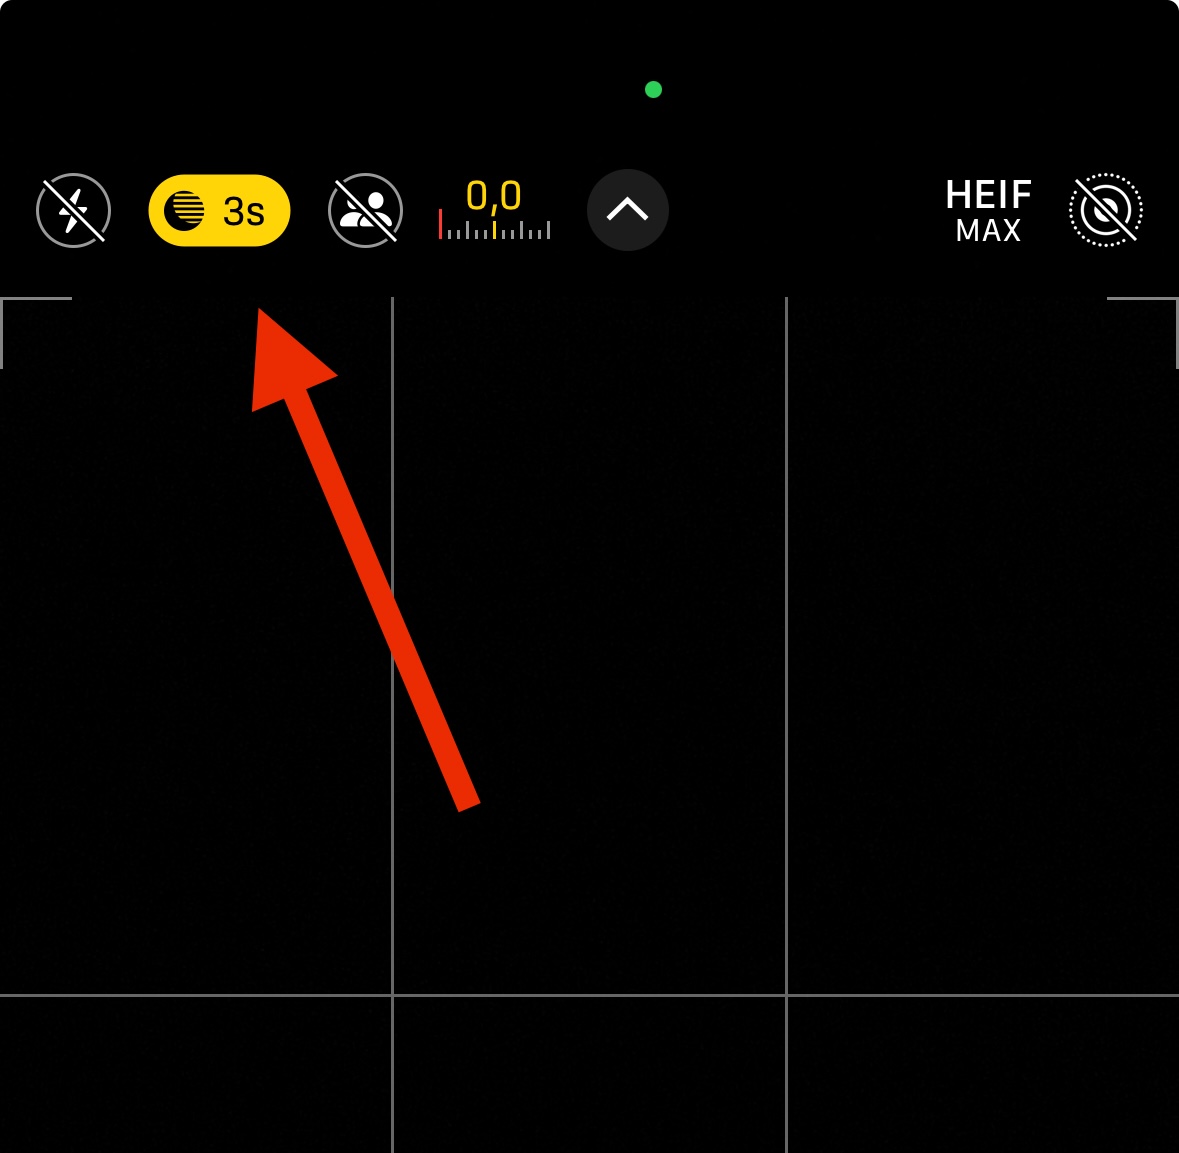
The ‘Night Mode’ functionality should activate on its own but if it doesn’t, you can press this button to enable it.
Step 5: Manually Focus On Your Subject & Take The Shot
Tap on the screen to manually focus on your subject. This could be a fun or interesting object in the foreground, or even yourself if you are attempting to take a selfie under the northern lights. If you want to include only sky, your iPhone will automatically focus to infinity.
Step 6: Adjust The Shutter Speed Manually If Needed
After taking a first test shot, verify how visible the northern lights are on your photograph. If they are quite weak, try increasing the shutter speed. You can do that by swiping up in the middle of the Camera app, and then tapping the ‘Night Mode’ icon. If you are using a tripod to stabilise your iPhone, you will be able to do much longer exposures than when shooting handheld. One final tip: don’t make exposures longer than 20 seconds, as you will get star trails in your shot due to the planet’s rotation.
Step 7: Enjoy The Moment!
Don’t forget to enjoy the show and look at up at the sky — not only through your lens!

By swiping up on the Camera app, you bring up more options. Find the ‘Night Mode’ icon there and use the slider to fine-tune the shutter speed.
What Are The Best Phone Camera Settings For The Northern Lights?
These are the settings I recommend whether you shoot with an iPhone or an Android phone. The principles are identical on every smartphone: a stable phone, the main lens, and the longest exposure your camera app allows.
| Setting | iPhone (default Camera app) | Android and other phones |
| Camera mode | Night mode | Night mode or Pro/Manual mode |
| Shutter speed | Night mode slider to maximum (10 to 30 s) | Typically 5 to 15 s manual |
| ISO | Set automatically by Night mode | Start around ISO 1600 to 3200 and adjust |
| Lens | Main 1x lens (no digital zoom) | Main 1x lens (no digital zoom) |
| Focus | Set manually on a bright star | Manual focus set to infinity |
| Flash | Off | Off |
| File format | Apple ProRAW if your model supports it | RAW or DNG if available |
| Support | Tripod or a completely stable surface | Tripod or a completely stable surface |
Can You Take Pictures Of The Northern Lights With Any Smartphone?
Yes, you can take pictures of the northern lights with almost any modern smartphone, not just an iPhone. Every recent flagship and most mid-range phones have a night mode that can capture the aurora, and the technique is the same as the steps above: stabilise the phone, use the main lens, and let the camera expose for several seconds.
On Android, look for Night mode in the default camera app, or use Pro mode to set the shutter speed and ISO manually. Some phones, such as Google Pixels and recent Samsung Galaxy models, also have a dedicated astrophotography mode that can work well for the aurora when the lights are slower moving.
Whatever phone you use, the dark sky matters far more than the brand. A budget phone on a tripod under a clear, dark sky will beat a flagship held in your hand every time.
Why Your iPhone Photos May Look Better Or Worse Than Reality
This is something almost everyone notices the first time they photograph the Northern Lights with a phone. To your eyes, the aurora can often look soft, fluid, and most of the time even faint. An iPhone, on the other hand, tries to brighten the scene by stacking exposures, which can lead to flatter contrast, less defined structure, and sometimes muted colors.
There are a few common reasons your photos don’t match what you saw:
- The aurora was relatively weak, even if it looked impressive in person
- The phone reduced noise, which also removes fine detail
- Motion in the aurora gets smoothed out during longer exposures
- The image processing prioritizes brightness over realism
On very strong nights, your iPhone can produce surprisingly vibrant results. I have even filmed the aurora handheld using my iPhone. But in many situations, what you capture will be a simplified version of what you experienced. And that’s completely normal! Even professional cameras struggle to fully replicate how the Northern Lights look to the human eye.
It’s almost impossible to exactly capture with a camera what you witnessed with your own eyes. Only when the aurora is really, really strong will you be able to capture an image that may somewhat resemble what you saw in person.
Frequently Asked Questions
Below are a few of the most commonly asked questions I have gotten about photographing the northern lights using an iPhone.
Can You Photograph The Northern Lights With An iPhone?
Yes, you can photograph the Northern Lights with an iPhone, especially with newer models that support Night mode. Results are best when the aurora is strong, the sky is dark, and your phone is mounted on a tripod.
What Are The Best iPhone Settings For Northern Lights Photos?
The best starting point is to use the default camera app with Night mode enabled and the longest exposure available. Use the main 1x lens, keep the phone completely still, and avoid digital zoom.
Do I Need A Tripod To Photograph The Aurora With An iPhone?
No, but a tripod is highly recommended. Because your iPhone needs a longer exposure in dark conditions, even small movements can make your photo blurry. A stable tripod makes a big difference.
Which iPhones Work Best For Aurora Photography?
Newer iPhones generally work best, especially models with Night mode and improved low-light performance. The newer your iPhone, the better your chances of capturing cleaner and brighter Northern Lights images.
Do I Need A Special App To Photograph The Northern Lights?
No, in most cases the default iPhone camera app is enough. Third-party apps can offer more manual control, but the built-in camera is usually the easiest and most reliable option for photographing aurora.
Why Do My iPhone Northern Lights Photos Look Blurry?
Blurry aurora photos are usually caused by camera shake, poor focus, or movement in the lights themselves during a longer exposure. Using a tripod and keeping the phone steady will help improve sharpness.
Why Do iPhone Aurora Photos Look Different From What I Saw?
Your iPhone processes the scene differently from your eyes. It brightens the image and combines multiple exposures, which can make the final photo look flatter, softer, or less natural than the real experience.
Can Older iPhones Photograph The Northern Lights?
Older iPhones can sometimes capture the aurora, but results are usually more limited. Without Night mode and improved low-light performance, it becomes much harder to get a clear and detailed image.
How Do I Set My iPhone Camera To Night Mode?
iPhones from the iPhone 11 and later switch to Night mode automatically when they detect a dark scene. A yellow half-moon icon appears at the top of the Camera app. Tap that icon, then drag the slider to the right to set the exposure length. There is no manual toggle, and the icon will not show up if the scene is too bright.
How Can I Use My iPhone To See The Northern Lights Tonight?
To use your iPhone to spot the Northern Lights, open the Camera app, point it at the darkest part of the sky, and let Night mode take a long exposure of 10 to 30 seconds. Even a faint aurora that the naked eye can barely see will often show up as a clear green or purple glow in the photo. Use a tripod and shoot away from city lights for the best result.
Do I Need A Filter On My iPhone To See The Northern Lights?
No. You do not need any filter, lens attachment, or special app to photograph the Northern Lights with an iPhone. The default Camera app with Night mode is enough. Filters reduce light and would make capturing the aurora harder, not easier.
Can Android Phones Take Pictures Of The Northern Lights?
Yes. Android phones capture the northern lights the same way an iPhone does: stabilise the phone, use the main 1x lens, and use Night mode or a manual exposure of several seconds. Phones with a dedicated astrophotography mode, such as Google Pixels, can produce especially good results.
Support Jeroen’s Work
As an independent photographer, Jeroen partially relies on your support to keep producing worthwhile content such as blogs, photographs, books and much more. If you want to support his work, it is possible to do so by buying his e-books & books or prints.
You can also sign up to the newsletter to stay up to date on new blog posts, projects, workshops and other interesting information.
Thank you for considering!