I have to admit that for a long time I ignored my camera’s ability to program custom modes. Why? Because I just didn’t see the point or purpose of those “C1” and “C2” buttons in my workflow. Before I began identifying myself as a hybrid photographer, I was primarily into landscape photography and managed just fine using the aperture & shutter speed priority modes. However, as my interest began moving more & more to wildlife photography as well, I began digging into custom modes and how to apply them to my workflow.
I am not exaggerating that when I finally decided to try custom modes out, everything changed. My photography – especially when switching between landscapes and wildlife – became faster, smoother, and far less stressful. In this blog I explain how using my camera’s custom modes helped me capture better moments in the field and increase my keeper rate.

Using custom modes is a quick and easy upgrade to your photography workflow, especially if you are a hybrid photographer who combines wildlife and landscape photography.
What Is A Hybrid Photographer?
Before I explain what custom modes are and how I use them, I want to share what I mean by a “hybrid photographer. To me, a hybrid photographer is someone who loves shooting both landscapes and wildlife, blending the techniques and creativity required for each. This is how I have seen my own photography evolve. One moment I might be chasing the perfect composition of a beautiful landscape scene, and the next I am tracking the movements of an Arctic fox.
By being a hybrid photographer you learn about flexibility. You learn to adapt quickly to changing situations and think about both the environment and the subjects that inhabit it. But how can you adapt quickly? What is the best workflow so you don’t lose time in the field fiddling with settings?

I love photographing landscapes, which is still my primary focus, but…

… I am doing a lot more wildlife photography these days.
What Are Custom Modes & Why Do They Matter?
Custom modes let you save your favorite camera settings for different shooting scenarios. You can think of them as personalized settings that you can easily switch to without having to give it much thought. Instead of manually configuring aperture, ISO, or focus settings every time you switch subjects, you can store each setup and recall it instantly. For hybrid photographers, such as myself, it is a real game changer once you adapt your workflow to accommodate for Custom Modes.
When I’m photographing wildlife, I need fast autofocus, a high shutter speed, the maximum frame rate, a higher ISO limit and possibly even pre-capture (also known as “raw burst mode” or “pre-continuous shooting” on some brands). But when I slow down for landscape photography, I want a slower shutter, a lower ISO, a slow frame rate and aperture priority.
Here is how I set up the 3 available Custom Modes on my Canon EOS R5 Mark II:
Custom mode C1 – Used for static landscapes
Settings: Auto ISO, 1/300s, largest aperture (lowest number), single centered focus point, single shot shooting & one-shot AF.
This custom mode is meant for handheld landscape photography, where speed is not that important. I stick to Auto ISO because with modern noise reduction functionality, I don’t tend to worry about noise in my images. Because I tend to shoot most with the Canon 100-500mm lens, I keep a faster shutter speed. For wider lenses, I will quickly slow that down to get more light in.
Custom mode C2 – Used for fast-changing landscapes or shooting whilst in motion
Settings: Auto ISO, 1/1000s, largest aperture (lowest number), single centered focus point, low speed continuous shooting & servo AF.
This custom mode is meant for handheld landscape photography, where speed is very important. This can be, for example, when photographing fast-moving landscapes (water) or when you are on the move yourself (on a boat, car, …). I stick to Auto ISO because with modern noise reduction functionality, I don’t tend to worry about noise in my images. Finally, I also set this custom mode to Servo AF to make sure I stay in focus in the case I am moving unintentionally (boat, car, …)
Custom mode C3 – Used for wildlife & birds
Settings: Auto ISO, 1/1250s, largest aperture (lowest number), automatic eye autofocus tracking, high speed continuous shooting, pre-capture enabled & servo AF.
This custom mode is meant for handheld wildlife photography, where speed is key. I stick to Auto ISO because with modern noise reduction functionality, I don’t tend to worry about noise in my images. To get the best possible results, I really heavily on the camera’s autofocus capabilities and its ability to constantly track focus. I also have pre-capture enabled to maximize my chances of getting the best possible results.
Switching between these custom modes takes less than a second and that’s often the difference between getting the shot and missing it.

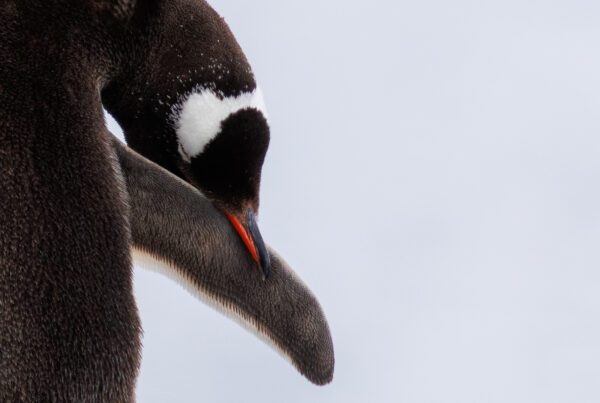
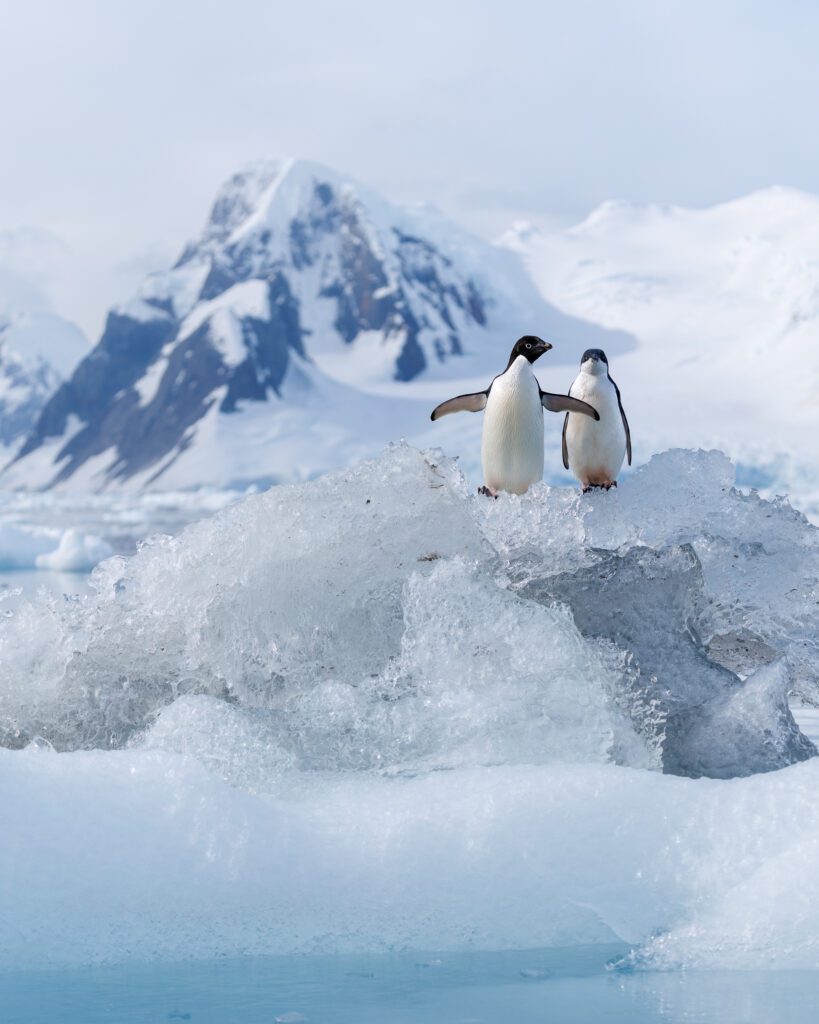
This image was captured with my C3 custom mode, which I have perfectly tuned for wildlife photography.

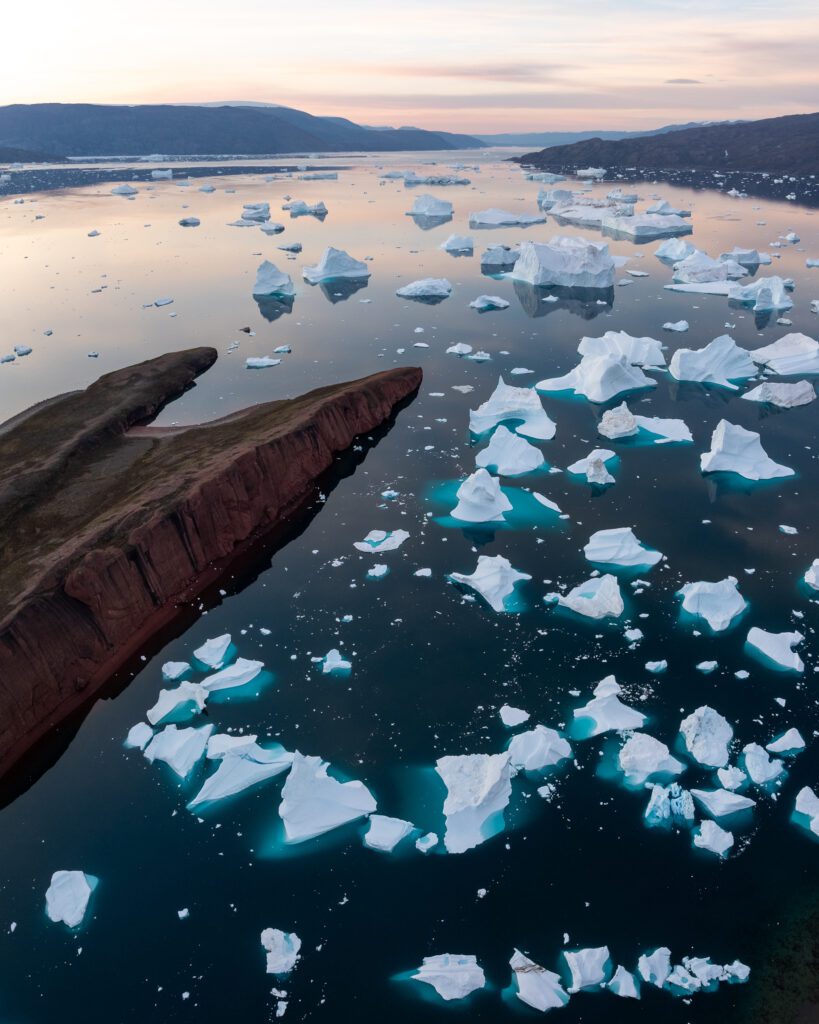
Using my C2 custom mode, I captured this shot of the Ilulissat Icefjord in Greenland. I use C2 for all shots taken from boats.
Why Custom Modes Are A Massive Timesaver In The Field
Before I started using custom modes, I used to waste precious time adjusting settings while the scene was changing rapidly before my eyes. I wasted time trying to figure out how to quickly switch between settings. Now, I focus on what matters: composition and framing.
For hybrid photographers, combining landscape & wildlife photography, being adaptable is everything. A good example is when I run a photo workshop in Greenland: while your primary objective is to capture the landscape, you never know when an unexpected polar bear or a pod of whales may show up. Being prepared for the unexpected is the best way to get the most out of the encounters. Another reason I use them is that whenever you turn on your camera, you know that each of the custom modes is set exactly back to whatever you programmed them for. Even if you adjust the settings while using a custom mode, they will always reset back whenever you turn off the camera or switch between modes.
With custom modes you stop thinking about settings and how to change them on-the-fly and you start thinking about the moment and the experience.

Thanks to my wildlife-focused custom mode I was super prepared to capture this incredible polar bear encounter we had during one of my East Greenland photo workshops.
How To Set Up Your Own Custom Modes On A Canon Camera
As you may or may not know, I am a Canon user so it makes sense for me to add exactly how you can set up custom modes on a Canon camera. Pretty much every modern camera today can do this but every camera is a little different so it’s a great idea to look into the manual of your specific camera.
Here’s a simple process that works on any Canon camera:
- Switch your camera to M (Manual) mode.
- Set your camera exactly how you like it for a specific shooting style.
- Go into the Settings and find the Custom Mode settings in the yellow menu pages.
- Save that setup to a custom mode of your choosing (check your manual if needed)
- Repeat this process to save settings to other custom modes (C2 & C3).

Even video-centric cameras, such as the Canon EOS R50V, have custom modes available to them.

Setting up custom modes on Canon cameras is pretty much the same across all of the models.
Final Thoughts
If you photograph both wildlife & landscapes, custom modes are one of the simplest upgrades you can make to your workflow. They save you precious time, reduce stress, and help you stay in the creative zone instead of the technical one.
For me, using custom modes turned photography from a juggling act into a flow. Whatever situation I find myself in, I know I can switch settings at a moment’s notice to fit the right circumstances and that makes all the difference.

I can’t imagine working without custom modes these days. Other than the occasional long exposure in Manual mode (M), I always use them.
Frequently Asked Questions
Below are a few of the most commonly asked questions about custom modes on modern cameras.
What Are Custom Modes On Your Camera?
Custom modes are programmable settings (typically marked as C1, C2, C3, …) that let photographers save their favorite shooting setups and switch between them instantly. Using custom modes is perfect for hybrid shooters moving between landscapes and wildlife.
Why Are Custom Modes Useful For Wildlife And Landscape Photographers?
They let you transition quickly between slow, steady scenes and fast-moving subjects without wasting time on manual adjustments. They allow you to focus on what is going on in front of your camera, rather than how to configure the camera itself.
Do Beginners Need To Use Custom Modes?
Custom modes are helpful for all experience levels. Beginners can learn consistency & focus more on composition rather than settings, while pros can fine-tune their setups for varying conditions.
Can Custom Modes Be Used For Video Too?
Yes. Pretty much all modern cameras let you assign photo and video settings separately within each custom mode.
How Do I Know Which Settings To Save In A Custom mode?
By using the three custom modes I outlined before in this blog, you have a great starting position. From there, you can tweak each one to your workflow and make them your own.
Discover Jeroen’s Photo Workshops in Iceland, Greenland & Beyond
Ready to take your photography to the next level? Join me, Jeroen Van Nieuwenhove, on unforgettable photo workshops in Iceland, Greenland, Antarctica and other exciting destinations. Whether your passion is wildlife photography, bird photography, landscape adventures, or mastering drone photography, each workshop is designed to give you hands-on guidance in some of the world’s most spectacular locations.
From puffins in the midnight sun to Arctic foxes in the wild, from glaciers and volcanoes to dramatic coastlines seen by drone – these journeys are more than workshops; they’re once-in-a-lifetime experiences. Group sizes are kept small, ensuring personal mentoring and plenty of shooting opportunities.
Looking for something specific? Check out Jeroen’s…
- Wildlife & Bird Photography Workshops (Puffins, Arctic Foxes)
- Drone Photography Workshops
- Photo Workshops in Iceland
- Photo Workshops in Greenland
- Photo Workshops in Antarctica
Spots are limited – secure your place today!
Are You Looking For A Specific Photo Workshop?
All Upcoming Photography Workshops With Jeroen
Explore all upcoming photography workshops with Jeroen and take your skills to the next level in some of the world’s most extraordinary locations. From the volcanic landscapes of Iceland to the ice-filled fjords of Greenland and the wildlife-rich polar regions such as Antarctica, each workshop is designed to help you grow creatively while experiencing unforgettable moments in the field. Browse all upcoming departures below and find your next adventure!

Puffins in the Midnight Sun 2026 Photo Workshop
LAST SPOT

West Greenland 2026 Photo Workshop
SOLD OUT

Aerials of the Icelandic Highlands 2026 (08-15 July)
SOLD OUT
Aerials of the Icelandic Highlands 2026 (01-08 August)
SOLD OUT
Aerials of the Icelandic Highlands 2026 (13-20 August)
SOLD OUT
Aerials of the Icelandic Highlands 2026 (22-29 August)
SOLD OUT
East Greenland Photo Expedition 2026
LAST SPOT

East Greenland With James Popsys 2026
SOLD OUT
Autumn in West/North Iceland 2026 (with Mads)
SOLD OUT
Iceland in Winter 2026 Photo Workshop (with Mads Peter Iversen)
SOLD OUT
Antarctica & South Georgia Photo Expedition 2028
OPEN FOR BOOKINGS
What Previous Photo Workshop Participants Said
Choosing the right photography workshop is about more than just visiting iconic locations. It’s about experience, safety, timing, and personal guidance. Below you’ll find honest reviews from photographers who have joined me on landscape, wildlife & drone photo workshops in Iceland, Greenland and other locations. These testimonials reflect real experiences in small groups, hands-on instruction in challenging conditions, and the level of care Jeroen aims to bring to every workshop.
These reviews are verifiable on Jeroen’s public Google Business profile.


")

")


Support Jeroen’s Work
As an independent photographer, Jeroen partially relies on your support to keep producing worthwhile content such as blogs, photographs, books and much more. If you want to support his work, it is possible to do so by buying his e-books & books or prints.
You can also sign up to the newsletter to stay up to date on new blog posts, projects, workshops and other interesting information.
Thank you for considering!